I'm actually really late on this update, so my apologies, I've had it ready for a while and my test games have gone well so far.
https://docs.google.com/file/d/0B_dGQQhS2y0vcmhxblNvYXkxVUU/edit
You may want to print the cards at say 95% I've had issues getting them to fit into certain brands of card sleeves (specifically the Ultra-Pro sleeves I bought specifically for this game)
Also, this file covers the Super Dungeon Explore base set. This set is not really of any importance, I just like converting all my figures to one rules set if I can. The figures are not meant to be perfect translations, some, such as the Paladin, have been redesigned a bit to be more characteristic of what I would have expected from them.
https://docs.google.com/file/d/0B_dGQQhS2y0vR0d3b2NrV3RJcDQ/edit
As I said, this set is just for fun, so there is more likely to be balance issues as I spend much less time tinkering with it. I literally hammered these all out in one evening.
Thursday, December 13, 2012
Friday, October 19, 2012
Chibi Crawl 10/19/12
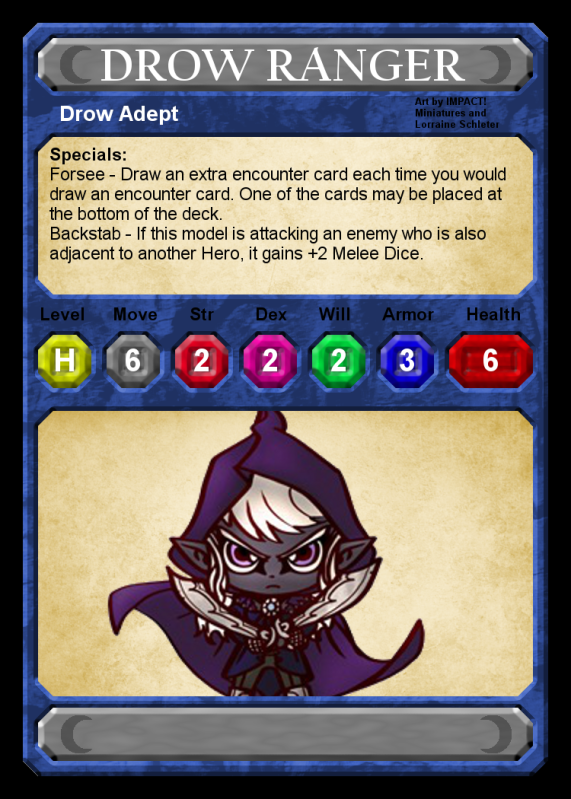
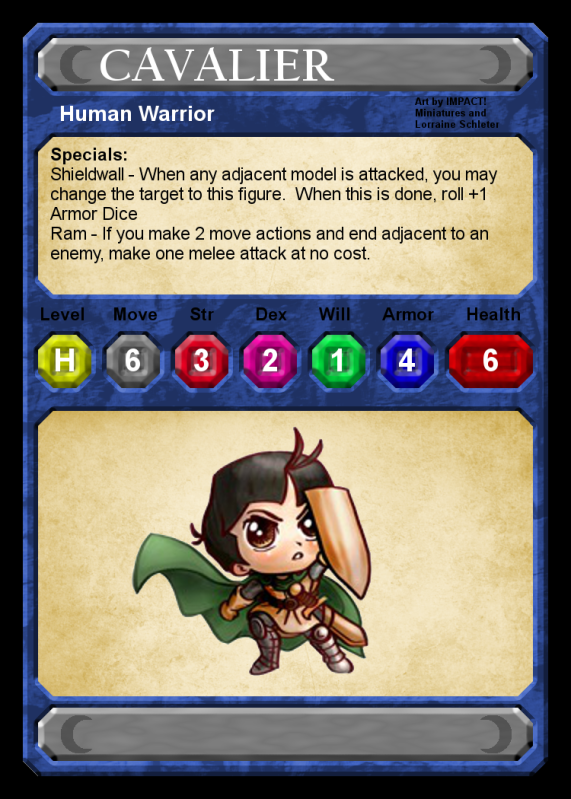
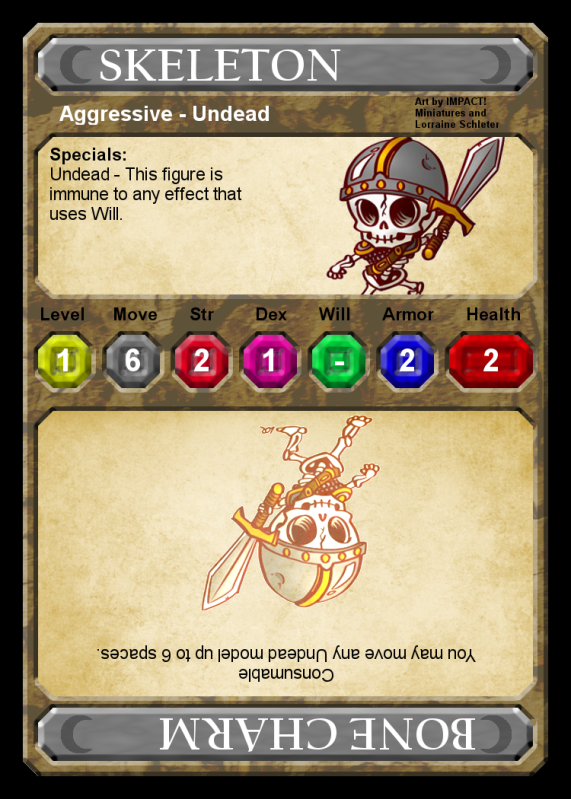
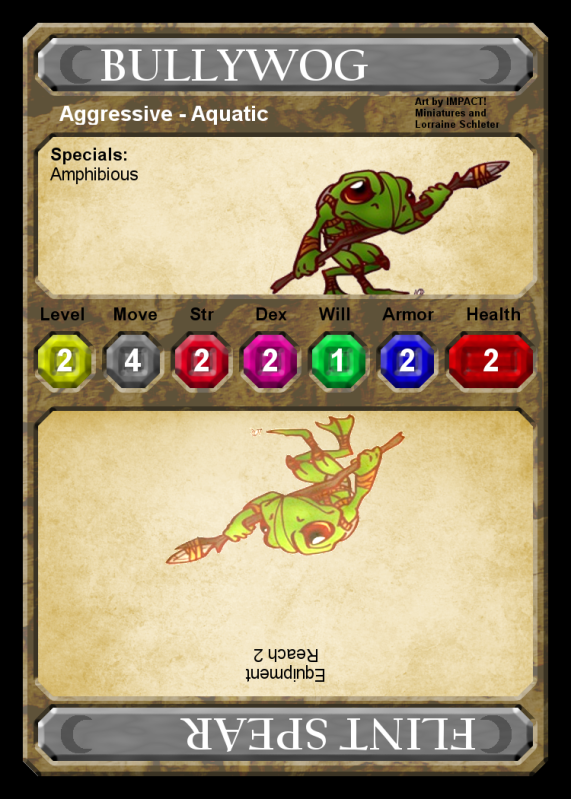
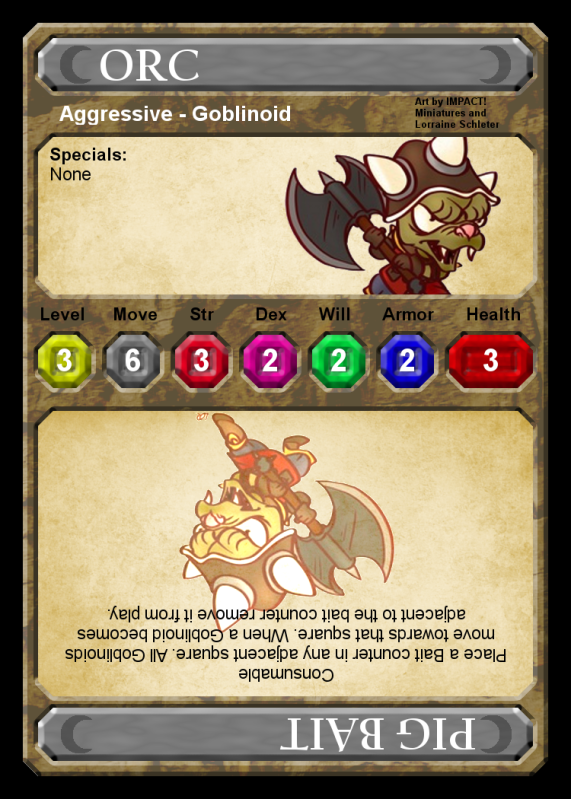
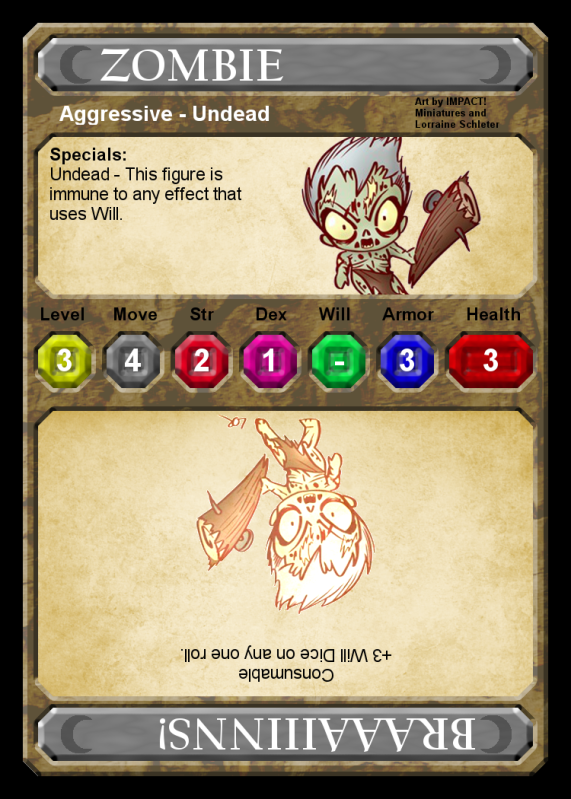
Alright, so cards are cleaner and easier to read, pretty sure some of the new monsters are in the mix.
https://docs.google.com/open?id=0B_dGQQhS2y0vdDdyWXVGSlVJejg
Also, this file contains figure produced by other companies. It's not too big, I think like 4 figures. I'll be doing more if my free time allows for it and I can gather the needed art.
https://docs.google.com/open?id=0B_dGQQhS2y0vU3AyLVRkX0ZGaTQ
Tuesday, October 16, 2012
Chibi Craw 10/16/12
Minor update, did a few more stat cards for new releases. I need to reconsider the Rogue class and break it down. I am having too many instances of them being archers when they shouldn't all fill that roll. Next update though. I adjusted the defense rolls to succeed on a 5+ instead of a 4+ as it sped up combat a lot. Also as an aside it made the game function with Heroquest or Heroscape dice if you so choose.
Chibi Crawl 0.2
Later,
Glenn
Chibi Crawl 0.2
Later,
Glenn
Thursday, October 11, 2012
Chibi Crawl Early Test Copy
Alright folks, this is a very early test copy of Chibi Crawl (Tentative Title) It is currently set up to be running with the new Dungeon Adventurers line from Impact! and dungeon tiles they produce.
Chibi Crawl Beta
Chibi Crawl Beta
Monday, October 8, 2012
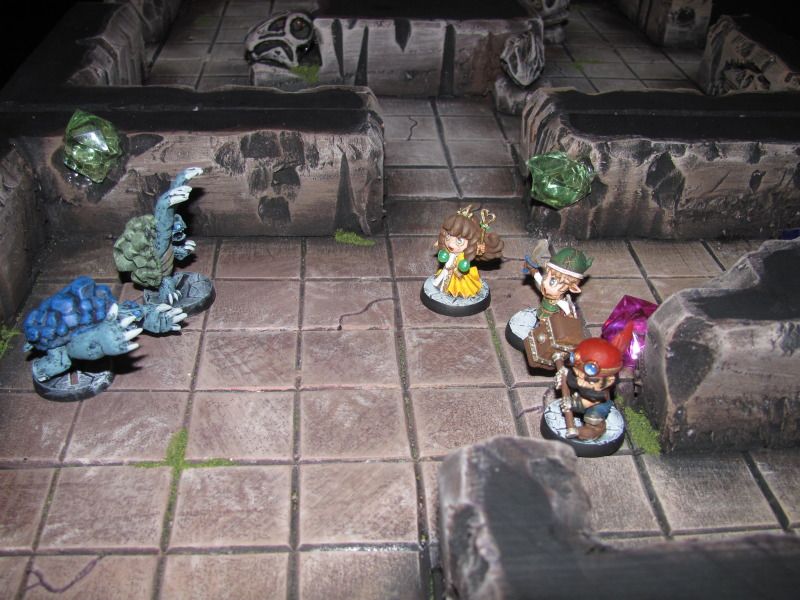
Co-Op Dungeon Crawl Update 3 (Chibi)
Alright, so I've been chewing through my dungeon crawl rules as quickly as I can. I worked out a small collection of cards to get tested through and some rough mechanics. There are a lot of questions at this point. I need to work out boss spawning, treasure deck density, and monster density. But, I am making some decent strides. As always, I appreciate any feedback you can provide, if you'd like to help out by making cards, or trying to help work out the balance issues and such, please let me know.
Rules
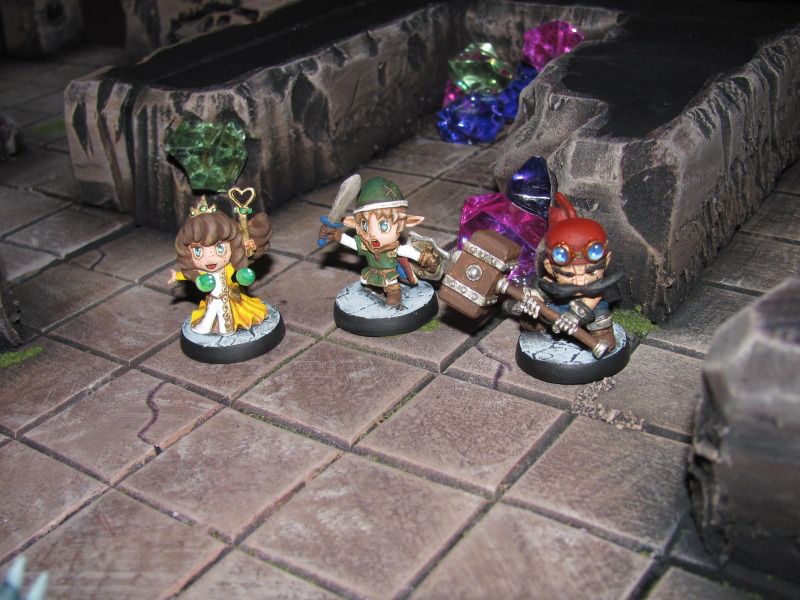
Heroes
Monsters

Thoughts?
Rules
Heroes
Monsters


Thoughts?
Saturday, October 6, 2012
Solo and Co-Op Dungeon Crawl Rules A2
So I've been spending a bit more time with my Dungeon Crawl rules (which need a proper name, suggestions?) And I have made some alterations. I am ditching the d10 and going to a d6 as the extra granularity didn't really do anything. All successes are measured on a 4+, there may be certain special abilities or items that alter this rule, reducing the number needed. I have expanded the stats slightly, and renamed them, so you'll see Level, Movement, Strength, Dexterity, Will, Armor, and Health. This lets me give everyone a Dexterity and Will value for purposes of letting certain effects have dex checks and the like. So to determine if a figure will have Ranged attacks or Magic attacks you'll have to look for the special abilities that state that. I am working hard to ensure that most special attacks have very concise wording. I am also trying to come up with a rough idea of how many treasures you can have in your deck. Meaning that some monsters will have no treasure. One option is that when you kill a monster you have to roll to find it's treasure, another is that some will simply state no treasure. I am leaning towards rolling to see if you get the treasure as it means it will be easier to balance the Encounter Deck.
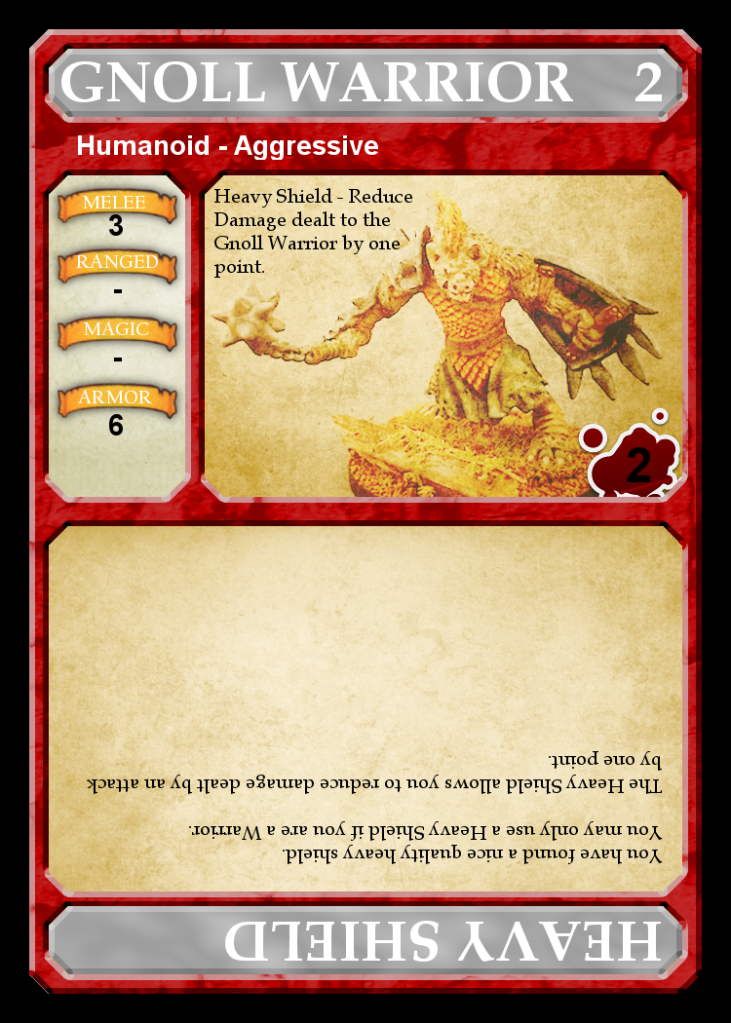
Here is the same monster card in both Chibi form and normal fantasy (Pathfinder)
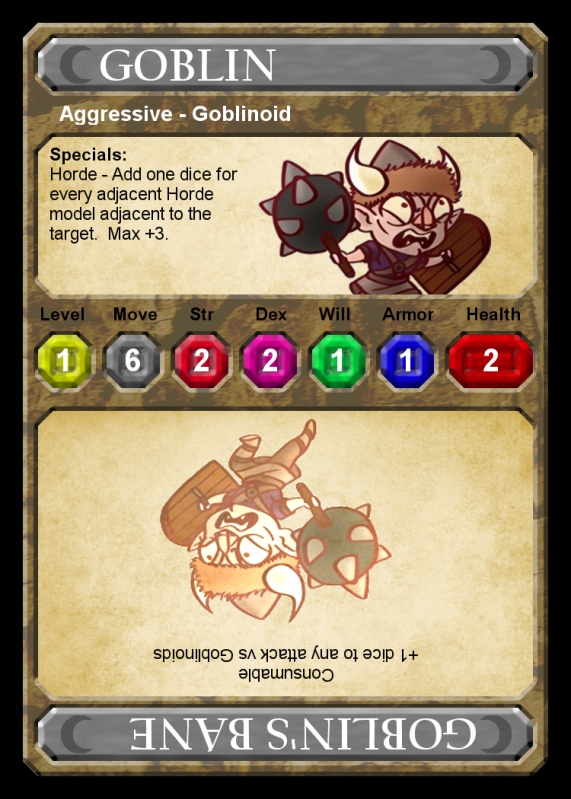
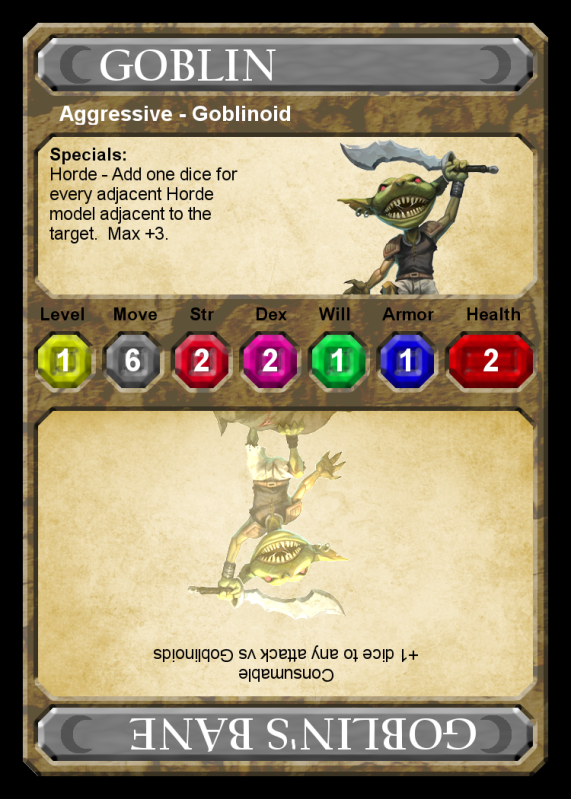
I'm gonna keep rolling a bit, I am fairly happy with the stat cards as they are right now.
Here is the same monster card in both Chibi form and normal fantasy (Pathfinder)


I'm gonna keep rolling a bit, I am fairly happy with the stat cards as they are right now.
Wednesday, September 26, 2012
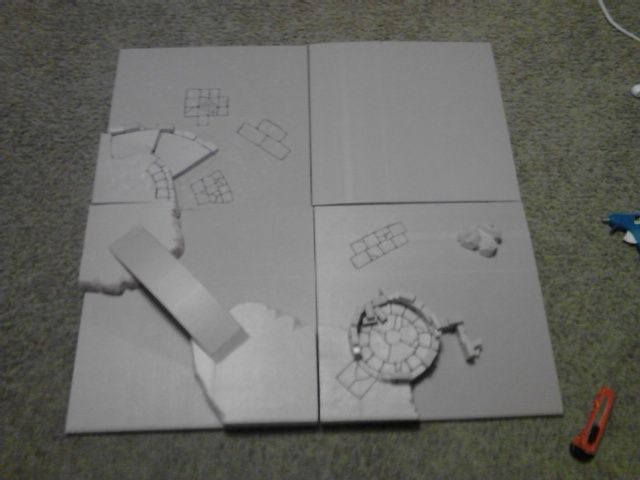
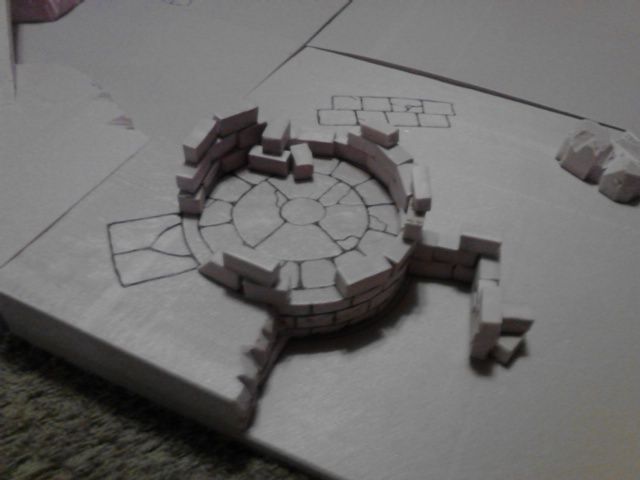
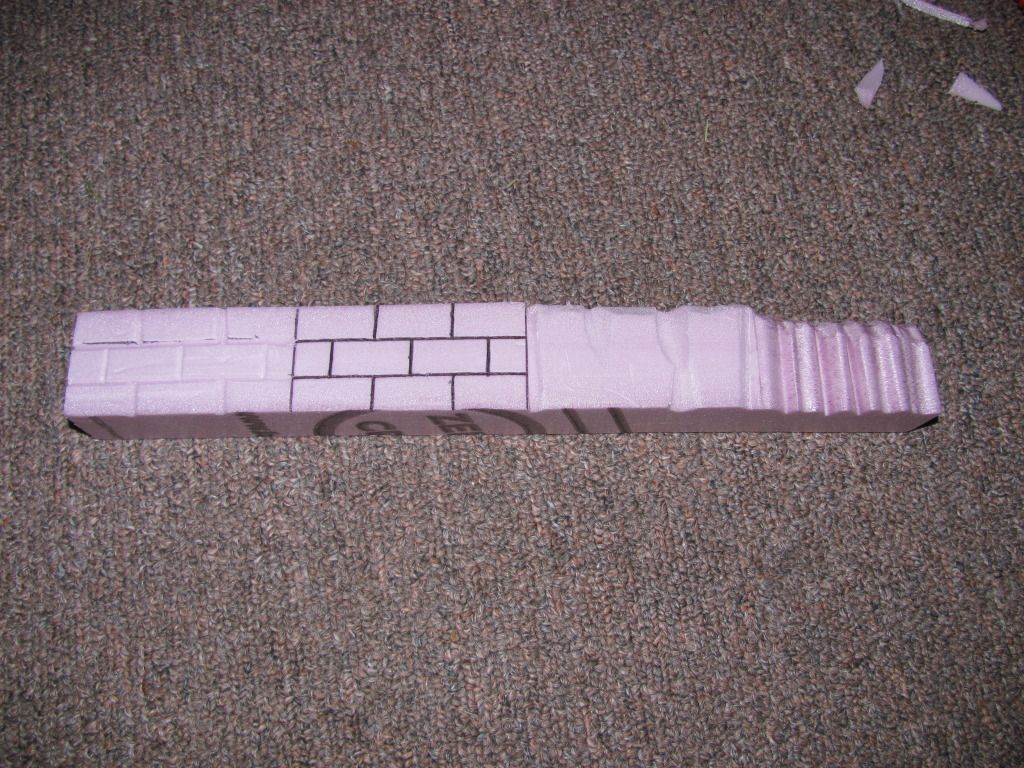
Modular Ruins Board Pt 2
So I whipped up the next two tiles, they just need spacking alpplied where needed and sanded. Then off to painting and flocking.


Tuesday, September 25, 2012
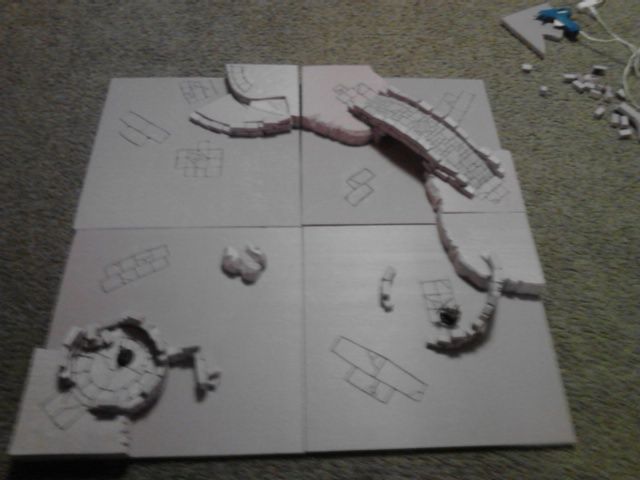
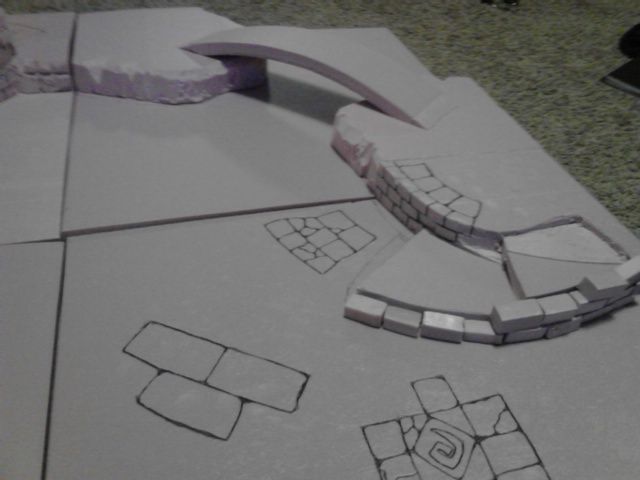
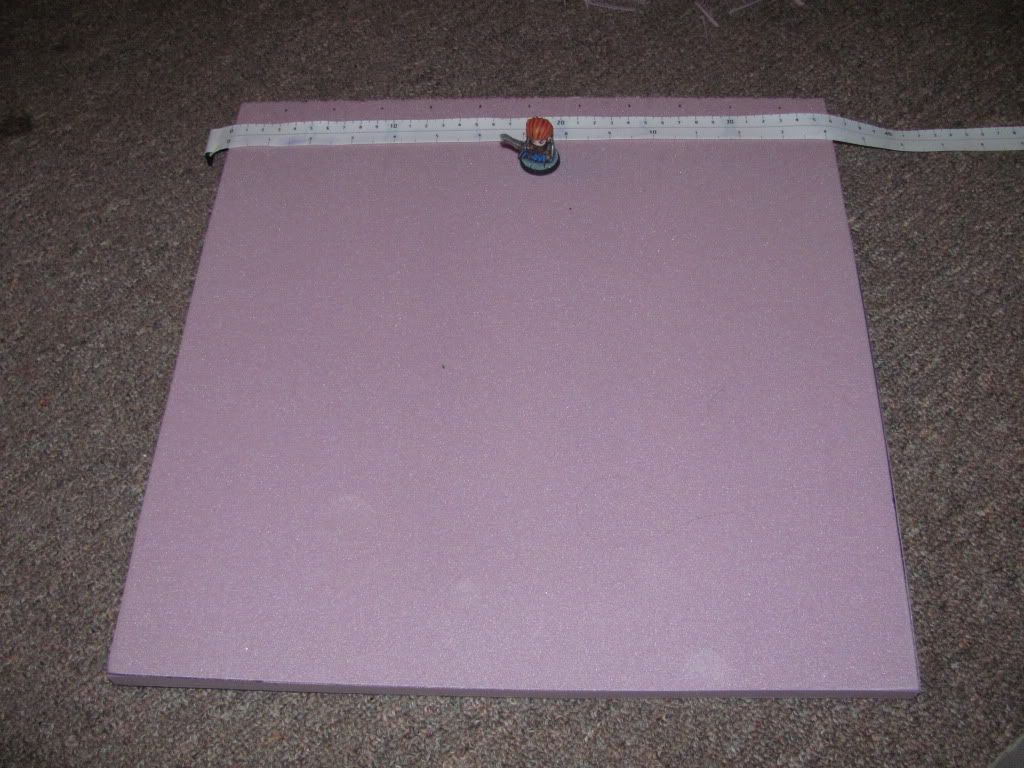
Modular 3x3 Terrain Board
So I had the incredible urge to try a new bit of terrain, this is a 3x3 board made of 4 1.5' panels. I should not it is far from complete, but you can get the overall premise from this. The bridge tile and the blank tile need a lot of work, the other 2 need detailed. Obviously I haven't messed with painting or anything yet. So far total expenses are about $15-$20 as all it is is Pink board and Hot Glue. I will be attempting to keep it that way.
Cheers


Cheers
Tuesday, September 18, 2012
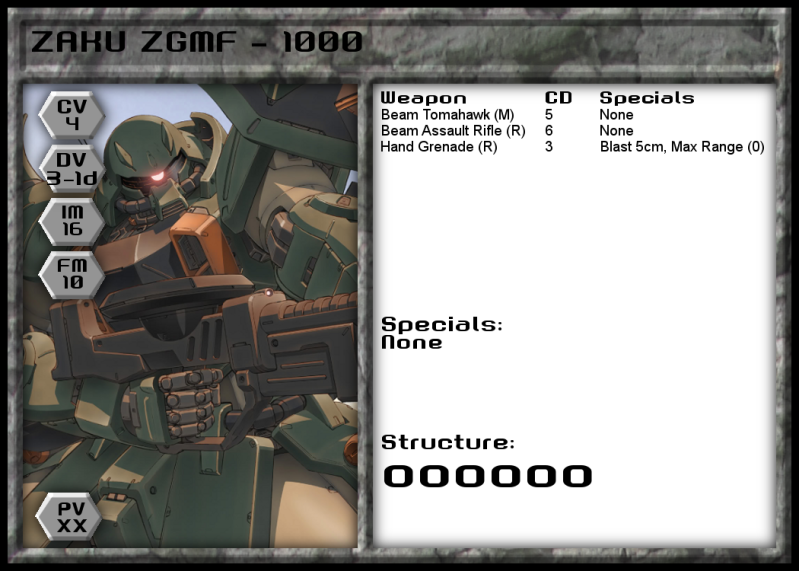
1/400 Scale Gundam Rules
So I've had piles of these little Gundam figures floating around for a long while. I have tried to use a few rules sets with them and not found anything I appreciated. So as a quick concept set, I worked out these rules. They allow for a pretty flexible game, units moving too and fro into and out of cover. Figures do not have to activated in any order and nothing will stop you from abusing your primary figures over and over (save their slow demise as they drain out of power) The rules are rather rough being written in a single pass. Also what stat cards are done are very erratic, so proxy or write your own cards up. My only concern to date is that the DV's values may currently be too low causing the game to be too slow.
Give them a whirl and let me know.
Gundam Strategic Operations
Give them a whirl and let me know.
Gundam Strategic Operations

Thursday, August 30, 2012
Ultramodern City - Prototype
I started working on an Ultramodern city for playing Relic Knights and whatever else on. I am trying to avoid the city rubble look that tends to plague gaming. I am building it mostly with foamcore, cardstock and clear plastic page dividers. There are obviously going to be detaily parts which are going to be more expensive, but for now, I have spent less than $10 and have fundamentally constructed for over 15 (4"x6") buildings, 6 (12"x12") floor tiles, and am less than half way through my supplies.
Here is a quick glance at two stacked structures.
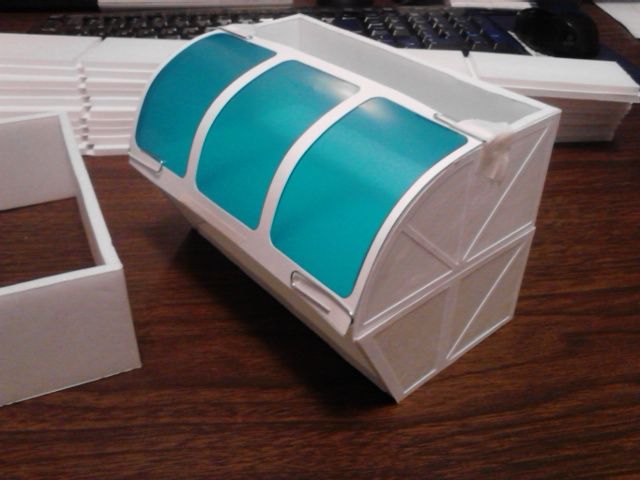
The intent is to build a bunch of these and a handful of key detail structures. Any structures with windows will have interiors designed as well. Most interiors will be glued to old gift cards that have been detailed out with chairs and such. Some walls will feature mounted screens and the like. I am endeavoring to make this as simple a project as possible and keep it cheap. Though I did just buy a police box for my wife to hide and a set of arcade machines (which will be detailed as Super Dungeon Explore arcades) to be positioned throughout the town. I'll be adding some vending machines and other fun things too.
Monday, August 27, 2012
My Wife's Blog
Ok, here is the deal, this is a link to my wife's new blog. I am going to say this totally upfront, it is entirely about sex. So, send your girlfriends and wives over to read it, they'll likely find it pretty interesting.
Fairies in the Head
Yes, my wife is nuts.
Fairies in the Head
Yes, my wife is nuts.
Sunday, August 26, 2012
Caverns of Roxor - Super Dungeon Explore Expansion
One of my purchases from Gencon was the expansion for Super Dungeon Explore, the Caverns of Roxor. Naturally I've been busting my butt to get it all painted as soon as I could.
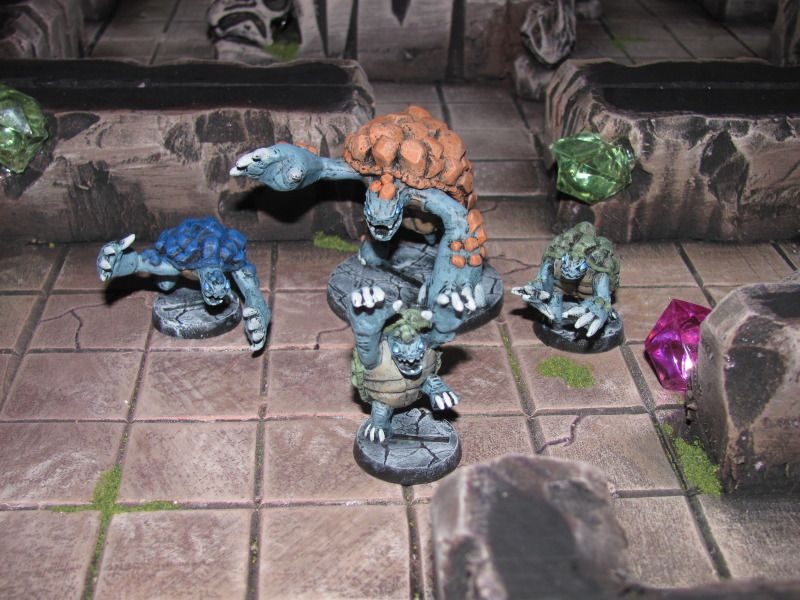
While there is a little bit left, the majority of it is right here.
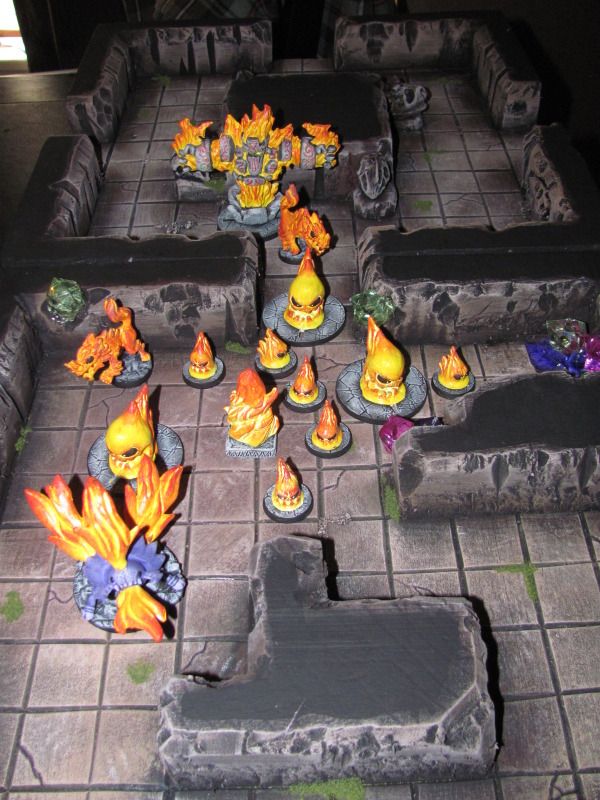
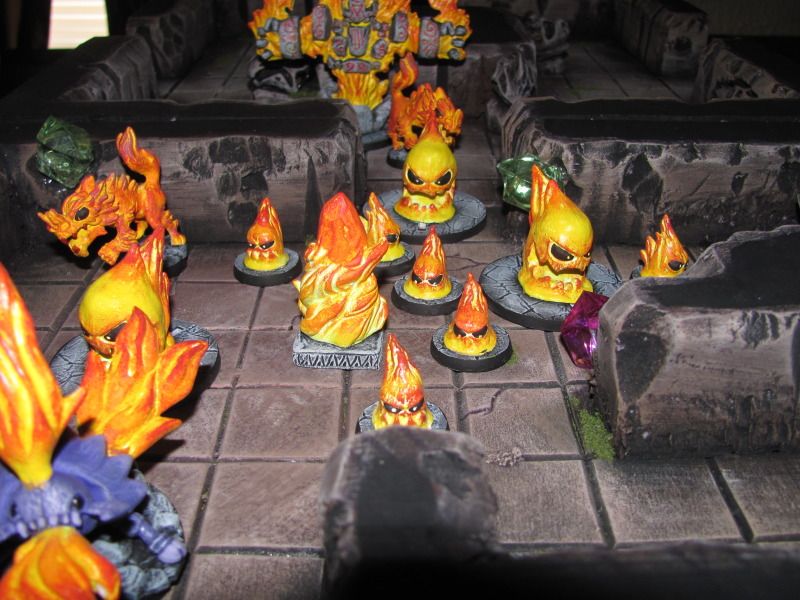
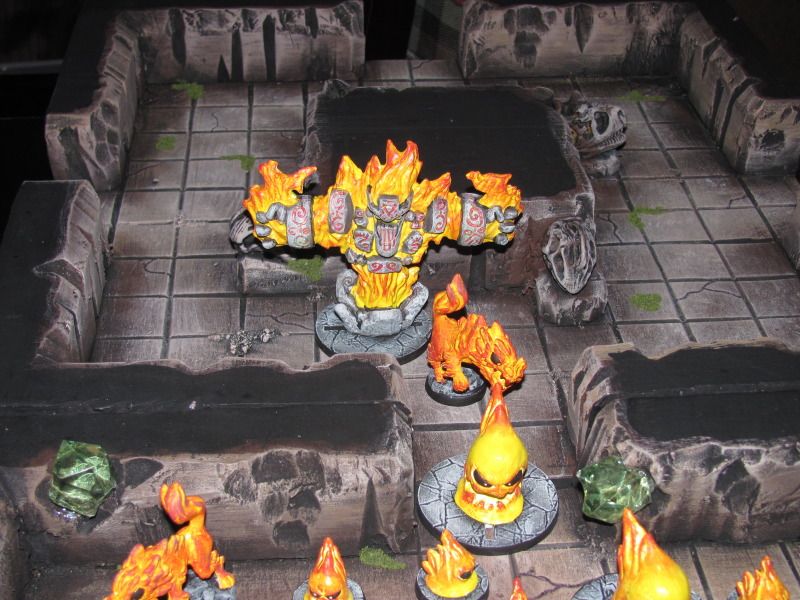
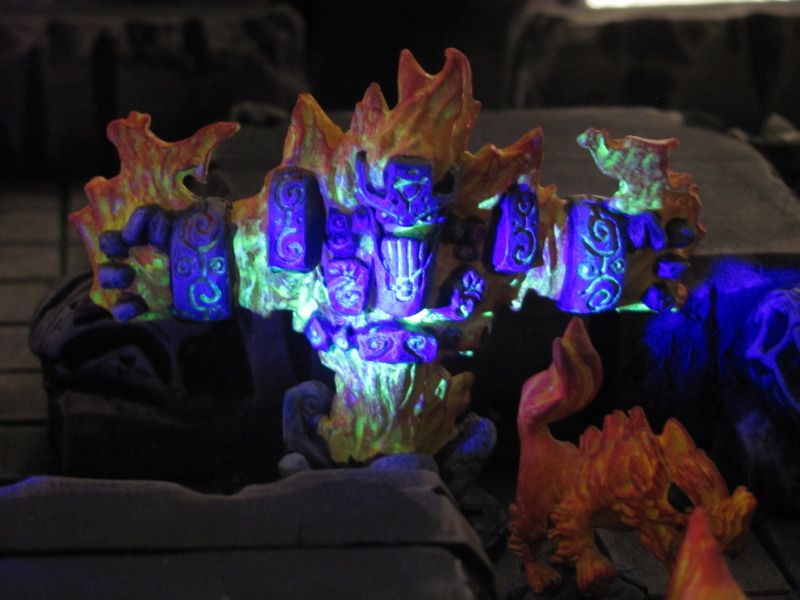
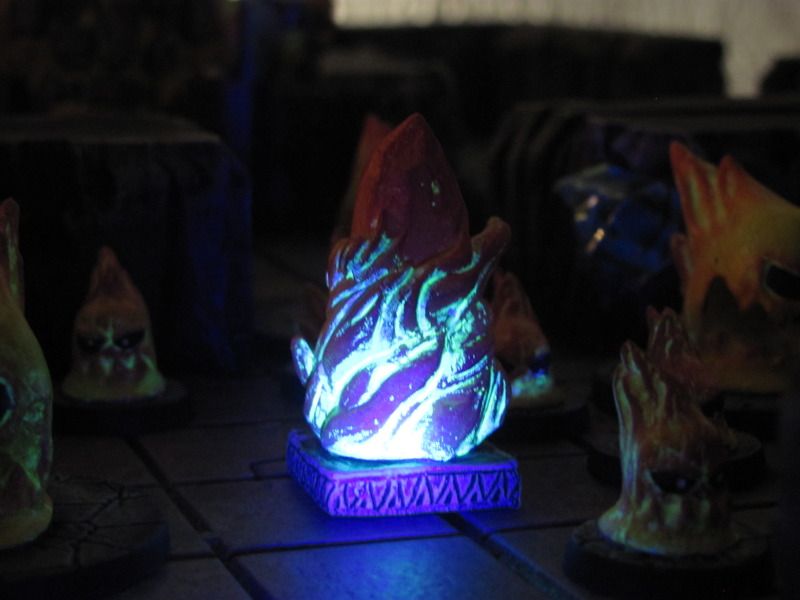
I painted all the Fire Flow Denizens with UV sensitive paints. I'll be embedding black light LED's into some of my future terrain.
Enjoy!!
While there is a little bit left, the majority of it is right here.


I painted all the Fire Flow Denizens with UV sensitive paints. I'll be embedding black light LED's into some of my future terrain.


Enjoy!!
Friday, August 10, 2012
Freebie Coop Dungeon Crawl
So, been searching around trying to find a game that suits my ideals for a dungeon crawl. Like normal, I can't find anything. Which makes me sad. So I took some concepts from a few other games and started piecing something together.
Essentially the game plays similarly to the D&D Board Games by default (though I am working on options to utilize with a normal map style game) With players moving along tiles, then revealing tiles when they have reach the edge of where they are. When a new tile is revealed it will be marked as either a normal or difficult tile, with some being even more challenging. A normal tile has you reveal one card from the Encounter deck which will generally be a monster, but some environmental effects are in there as well.
The mechanics are fairly simple, using a d10 engine all you need to do is roll the number of dice listed and try to get the result of your skill. Monsters are always treated as having a skill of 7 (Minibosses are 6, Bosses 5) Characters will be variable as it allows some basic granulation and controls what kinds of equipment they can use, sure you can give your warrior a wand of lightning, but he may need 8's to use it where as the wizard will only need 5's.
When you have killed a monster or completed an encounter, you can rotate the Encounter card and gain the treasure it carries. The quality of a treasure will be based on the monsters level, which is basically a quick look at a monsters overall strength.
Sample Gnoll Warrior (Reaper Miniatures)
Dungeons will have a few specialty tiles shuffled in, one will be the miniboss tile and one will be the boss tile. These tiles will help control the overall length of the game.
My hope is to be able to stat out the entire line of Reapers Bones list as well as any other dungeon crawl style games.
Sorry for the mildly rambly post, just dumping the rough idea, hopefully fairly soon I can provide a more detailed look or even demo set of rules.
Essentially the game plays similarly to the D&D Board Games by default (though I am working on options to utilize with a normal map style game) With players moving along tiles, then revealing tiles when they have reach the edge of where they are. When a new tile is revealed it will be marked as either a normal or difficult tile, with some being even more challenging. A normal tile has you reveal one card from the Encounter deck which will generally be a monster, but some environmental effects are in there as well.
The mechanics are fairly simple, using a d10 engine all you need to do is roll the number of dice listed and try to get the result of your skill. Monsters are always treated as having a skill of 7 (Minibosses are 6, Bosses 5) Characters will be variable as it allows some basic granulation and controls what kinds of equipment they can use, sure you can give your warrior a wand of lightning, but he may need 8's to use it where as the wizard will only need 5's.
When you have killed a monster or completed an encounter, you can rotate the Encounter card and gain the treasure it carries. The quality of a treasure will be based on the monsters level, which is basically a quick look at a monsters overall strength.
Sample Gnoll Warrior (Reaper Miniatures)

Dungeons will have a few specialty tiles shuffled in, one will be the miniboss tile and one will be the boss tile. These tiles will help control the overall length of the game.
My hope is to be able to stat out the entire line of Reapers Bones list as well as any other dungeon crawl style games.
Sorry for the mildly rambly post, just dumping the rough idea, hopefully fairly soon I can provide a more detailed look or even demo set of rules.
Thursday, August 2, 2012
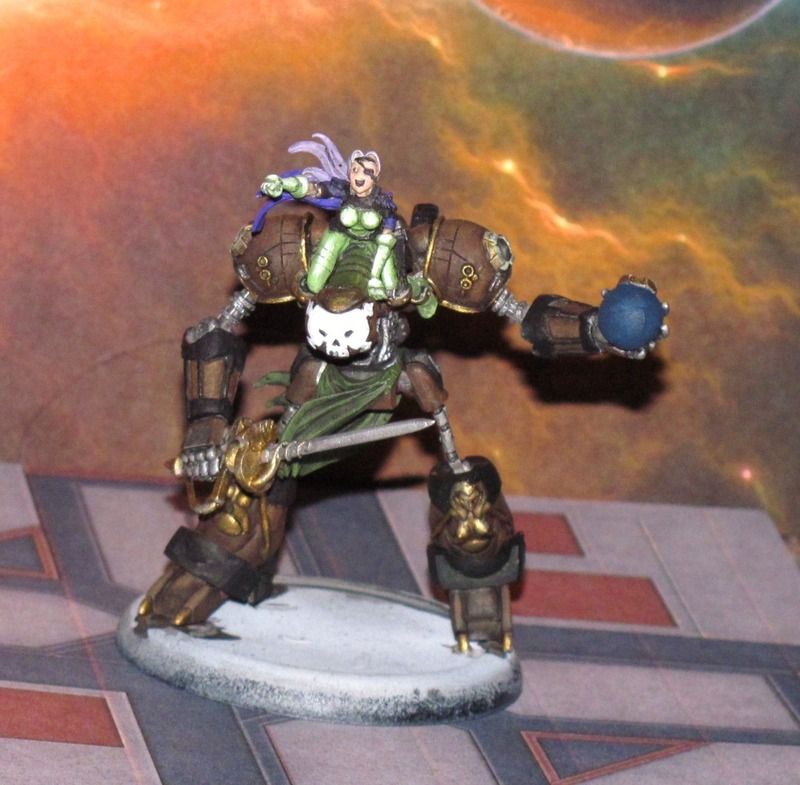
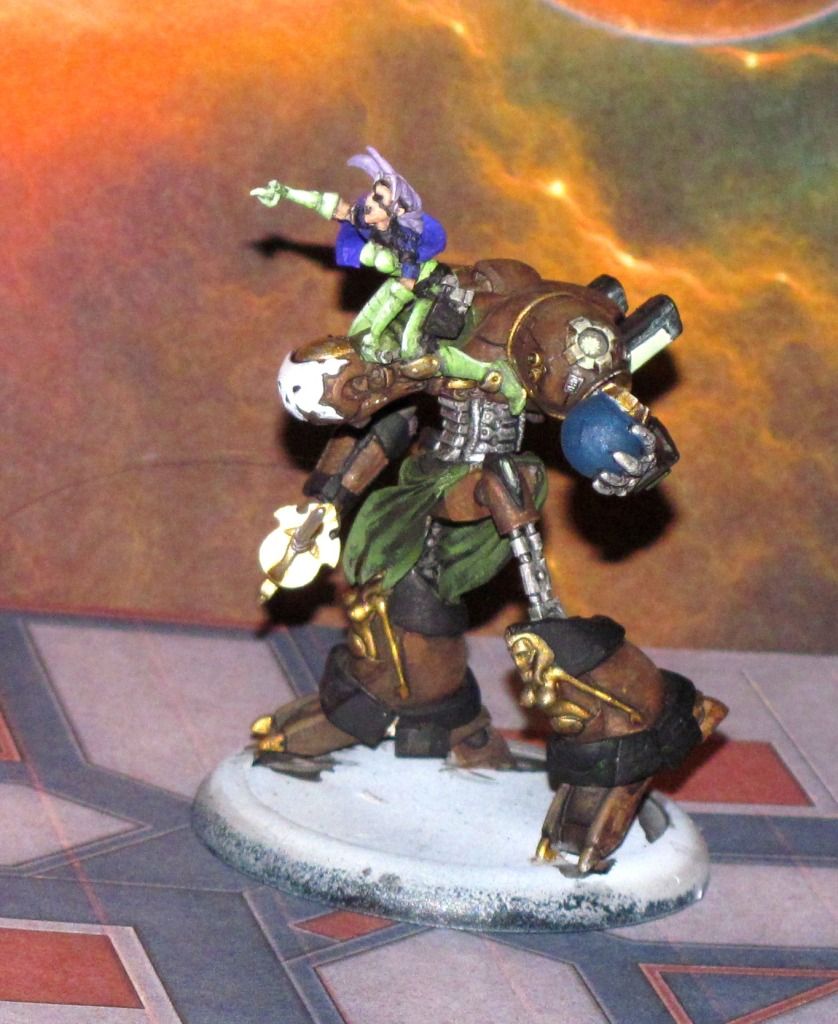
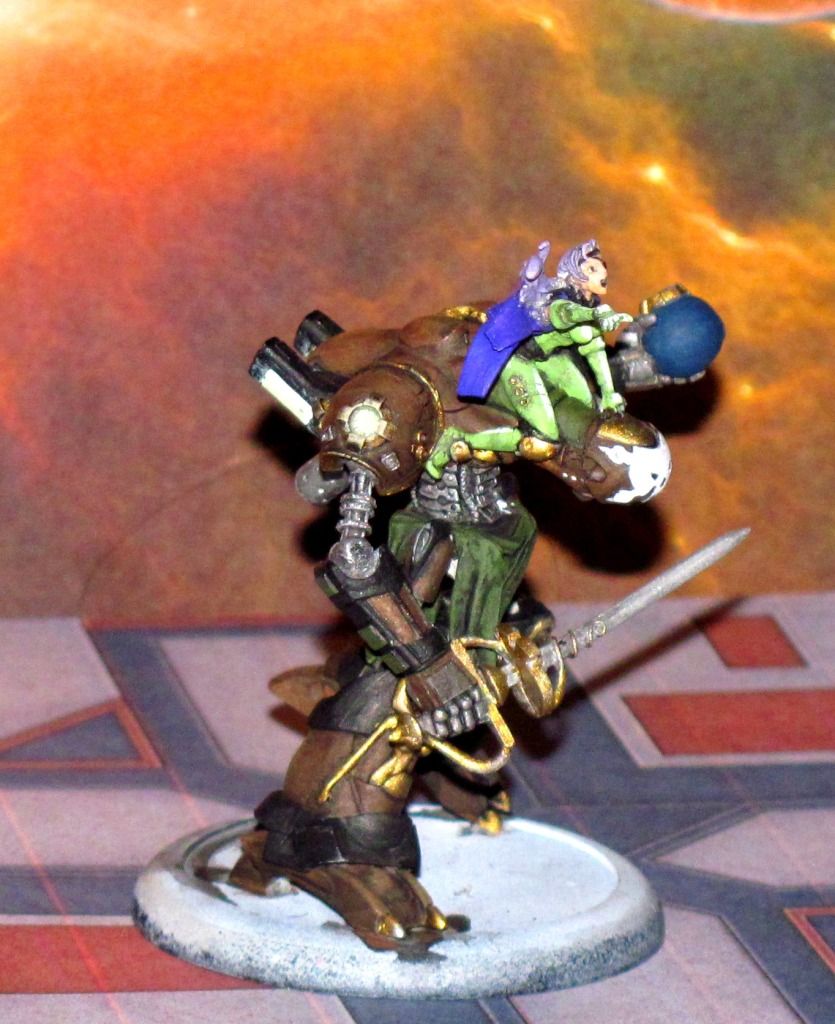
Relic Knight Calico Kate
So I finally pieced together my Calico Kate and got her painted up, she does need a base, but otherwise is complete. Though her darn pointing arm keeps breaking off. So that will need cleaned up when I am sure it isn't going anywhere. Anyways, thought you may want a sneak peek at her now. I do have a pile of other Relic Knight figures that are in various states of assembly getting prepped to paint, it'll be a long project as the figures have tons of character and fiddly bits that don't like to stay. And I suck at pinning.
Later,
Glenn


Later,
Glenn
Friday, July 27, 2012
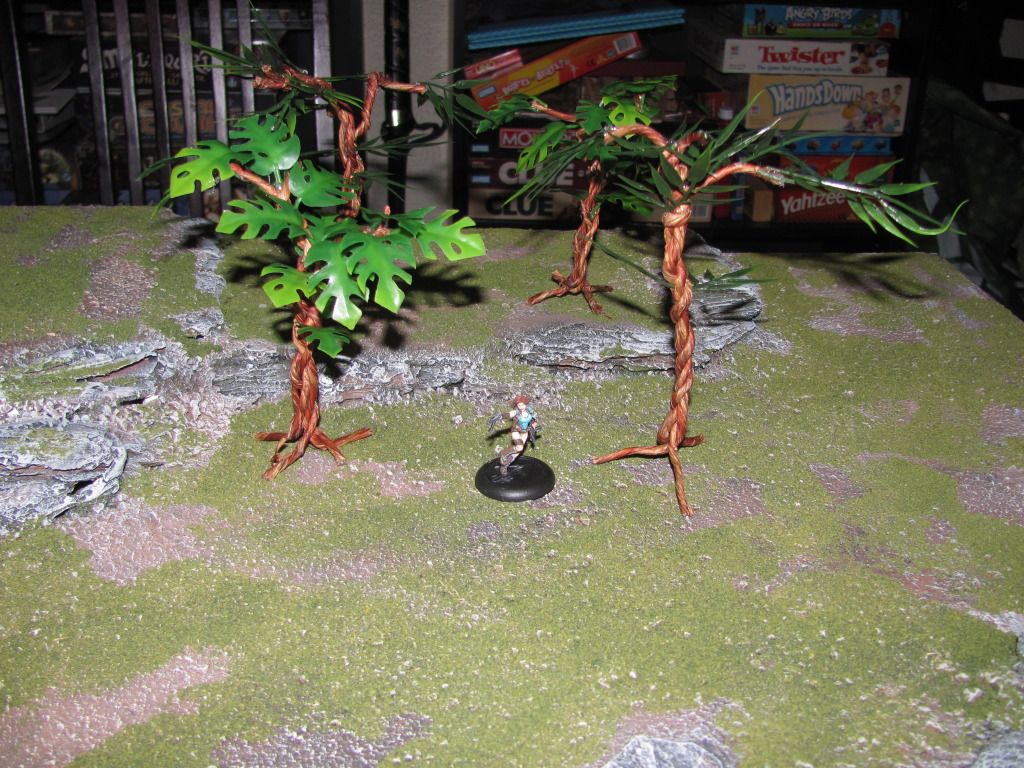
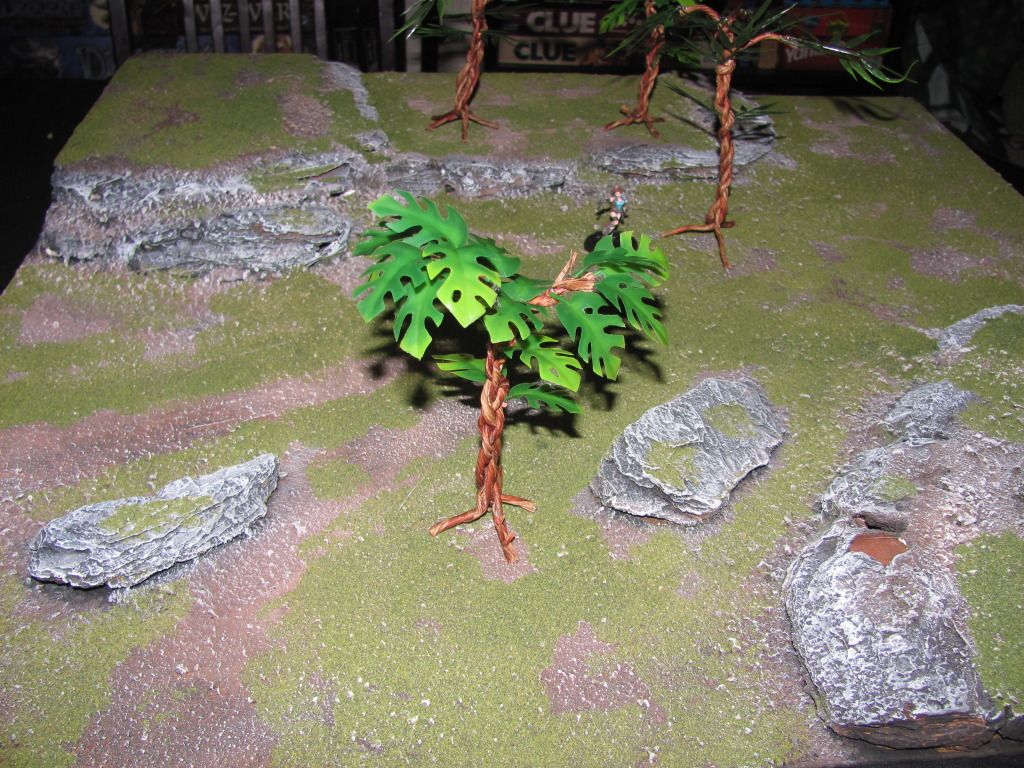
Simple Trees
So I have seen a number of simple tree designs in the past, some aren't too bad, some are insane, some look like crap, some aren't too shabby. However, I recall seeing a post once upon a time on the Heroscapers forums about some trees a gent made using something called Naturally Wired, it is wire wrapped with a sort of plant material, it is a shade of brown with natural variation. So I looked it up and managed to snag a 40' roll from JoAnn fabrics for $8. I then grabbed a few different sorts of plastic plants to experiment with, one is bamboo leaves, the other is Amazonian Phyllo, the latter I prefer, but they both work, you could use a number of other leaf types.
The construction process is pretty simple (though I didn't photograph it, but you'll be able to figure out) cut between 4 and 6 wires around an equal length. Bend about an inch of it with a pair of needle noses and keep a hold, then start twisting it all together in whatever pattern you'd like, it doesn't have to be perfect. Make some branches up top by leaving some without merging and some in smaller groups. Now grab your plant and start pulling the leaves off, leave a bit of stem behind as it will make it easier. Grab your hot glue gun and go to town, try and make them pretty. Now, I will admit, I could have gone a step farther and painted my hot glue gun blobs to hide them, but I don't really care as you'll likely never notice.
You can turn out a good quantity of these pretty easily and quickly and they are quite cheap if you do enough.
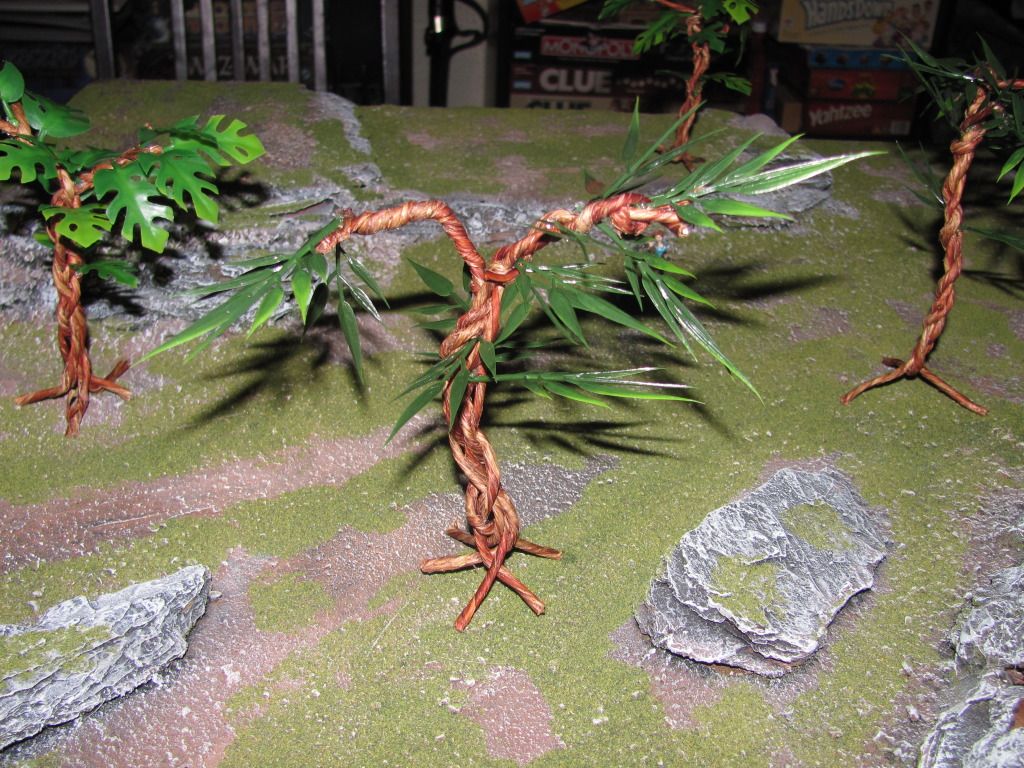
Till next time campers :D
The construction process is pretty simple (though I didn't photograph it, but you'll be able to figure out) cut between 4 and 6 wires around an equal length. Bend about an inch of it with a pair of needle noses and keep a hold, then start twisting it all together in whatever pattern you'd like, it doesn't have to be perfect. Make some branches up top by leaving some without merging and some in smaller groups. Now grab your plant and start pulling the leaves off, leave a bit of stem behind as it will make it easier. Grab your hot glue gun and go to town, try and make them pretty. Now, I will admit, I could have gone a step farther and painted my hot glue gun blobs to hide them, but I don't really care as you'll likely never notice.
You can turn out a good quantity of these pretty easily and quickly and they are quite cheap if you do enough.


Till next time campers :D
Tuesday, July 17, 2012
Resin Rabites
So I finally manned up and bought casting supplies and started to make resin copies of my rabite figure.
It has been going fairly well, learned a lot so far, I'll have to make another mold in the future, however this one is working alright now that I've made some modification. Here are some of the copies, all of them have some minor imperfection, their is a spot on the tail that is prone to getting a bubble. I little liquid green stuff should fill it in nicely though. Some of my first casts had bad ears, I had to modify the mold to fix that. I am going to attempt to reconstruct the ears on those myself.
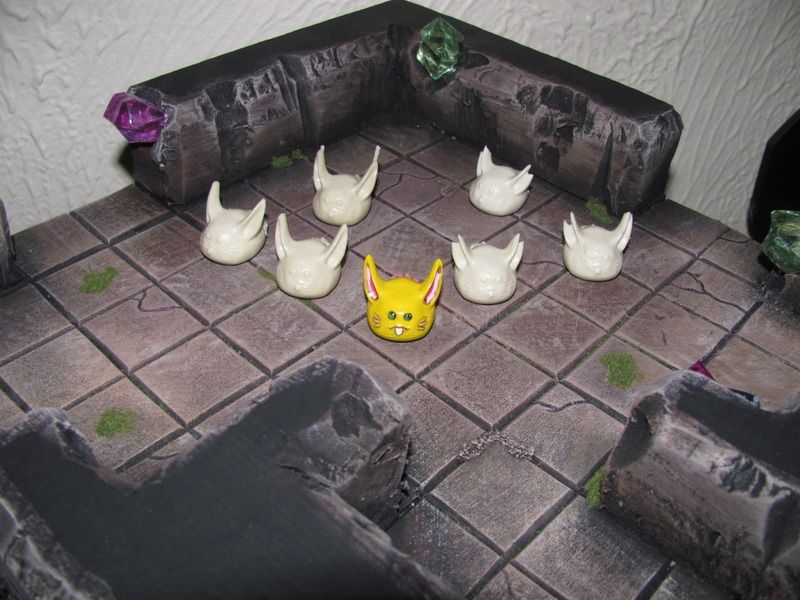
Now, I am certain I will have at least a few folks asking for these, if you want some cast for you, I can do that, I cannot however guarantee they will be free from defect, see the above about the tail. This will likely be all that is wrong with them. I am leaning towards $4 per figure (normally I'd say $5 but the tails bother me)
Monday, July 16, 2012
Insulation Board Dungeon Tutorial Pt 2
I was holding off a bit till I got to painting, but I've not had the time to mess with it too much, so here is the chunk of designing the walls and detailing the floors.
Detailing Floors
To do the floor detail is really easy, get a ballpoint pen (Some people use a dead one, I like to see my lines and find it is easier when the ball still rolls) then have at it. This is really easy actually. If you want to roughen up your ground, you can use an aluminum foil ball as shown below.
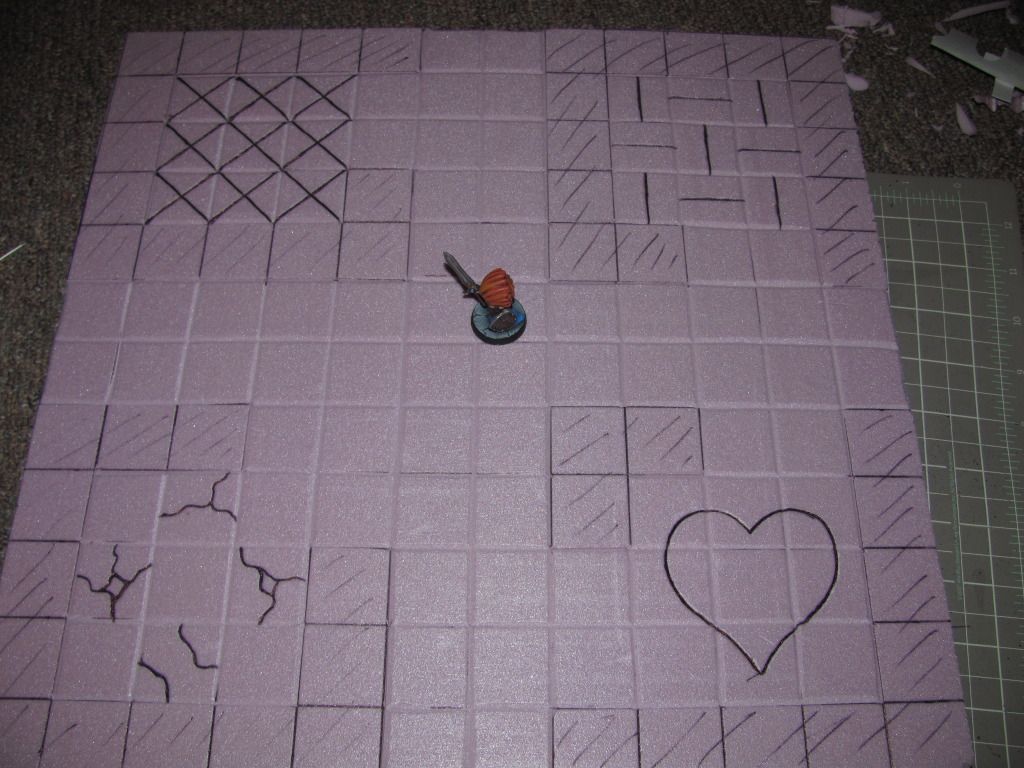
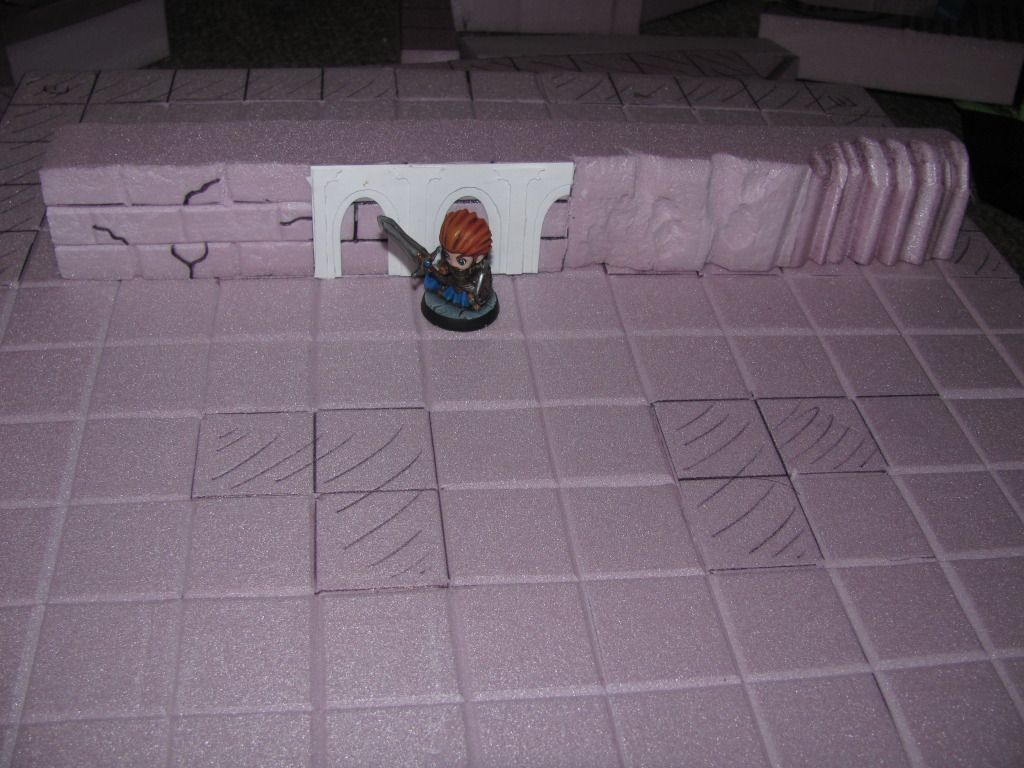
Wall Design
I am doing the walls in a variety of techniques at once here, so bear with me. Sections 1 and 2 are both hewn rock walls, 3 and 4 are different types of cave walls.

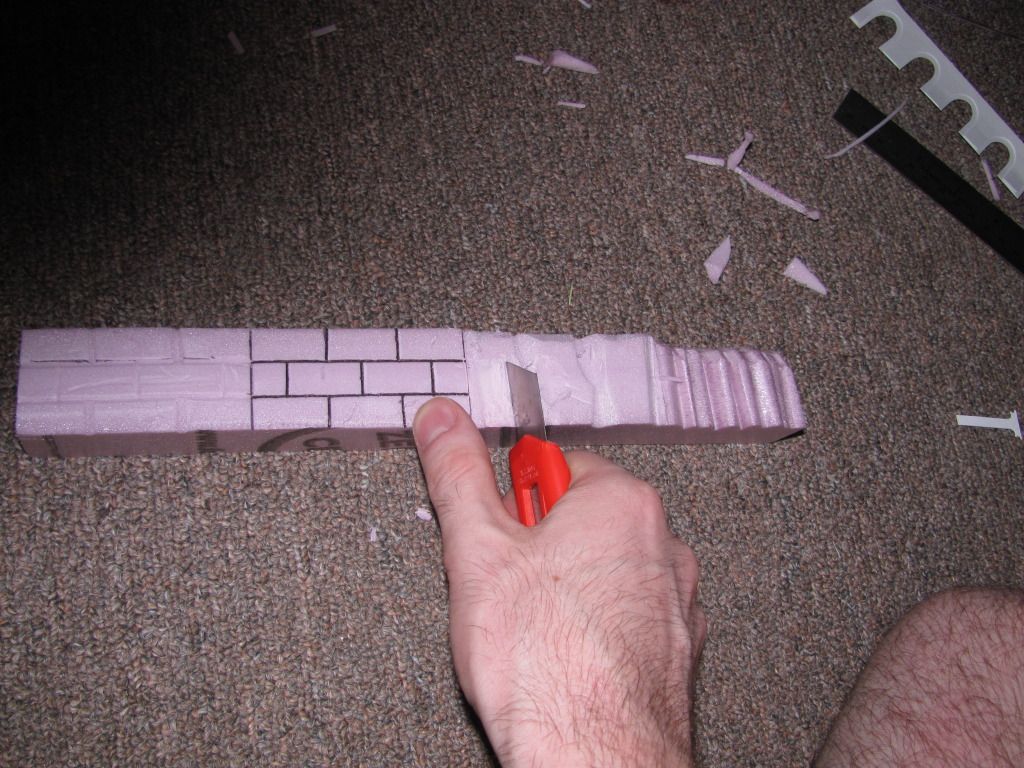
Section 1 has blocks cut out like the floors are done, this creates an old block feeling which would be good for most dungeon style layouts. It is mildly time consuming but looks nice. Section 2 has blocks drawn in with a pen, this creates a new block wall style that would work well for a castle or an egyptian looking location. Section 3 is done by taking the knife at an angle and ripping chunks of foam out. It is fast easy, but does require a little bit of time to learn to do well, a few practice pieces will work well, try whatever tools you have around. Section 4 is done with a wire cutter, this would make nice ice or water worn cave.
I'm going to spend more time on 3 as it is what most of you have seen from me and seems to work best for Super Dungeon Explore (especially with Caverns of Roxor coming out soon) After cutting some chunks out with a knife, take your fingers and dig in with your nails pulling upwards, this makes a circular pocket pullout that works well, linking them together has a pleasing appearance.
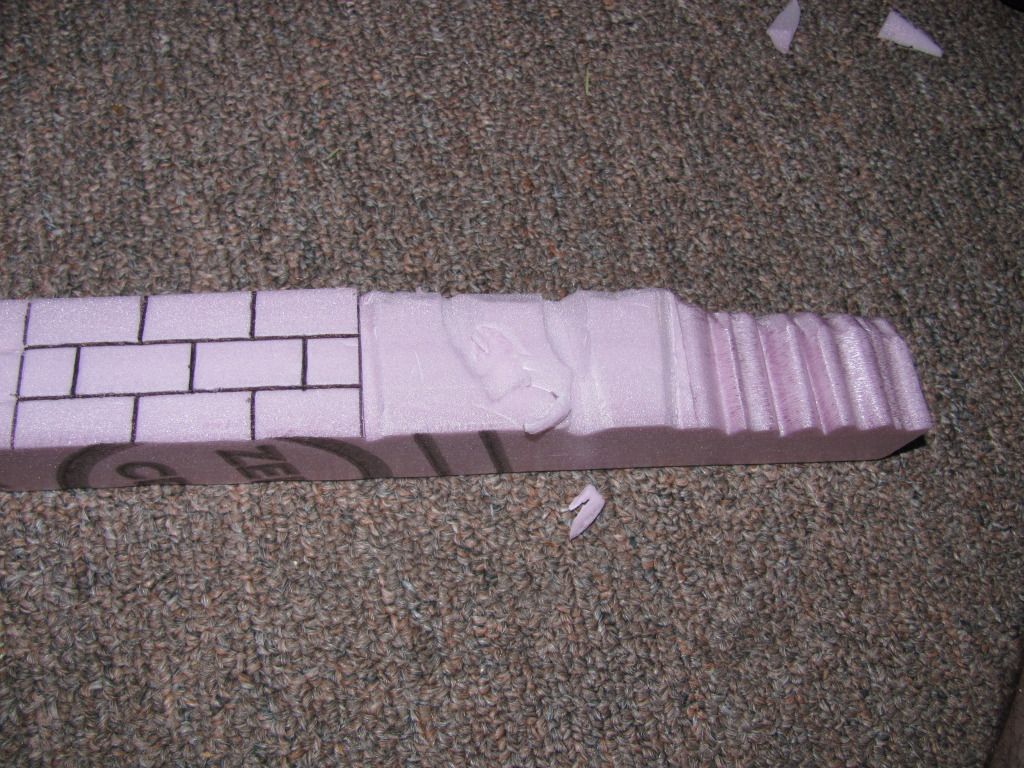
Now, holding the knife perpendicular to the surface drag it across lightly, do this a bit till it starts to break apart. Then rub with your finger tip.
Lastly, section 1 and 3 have had a ball of aluminum foil rolled across them, this makes a nice rough surface that works well for drybrushing, to be honest, I don't like this appearance and rarely use it. However, it does work well and can create a nice appearance.

Once again, break out the pen and draw cracks onto section 1, this gives the stone character, try and be random. Evenly spaced is not random, have some clumps, have some clean sections, etc. When painting, weather accordingly.
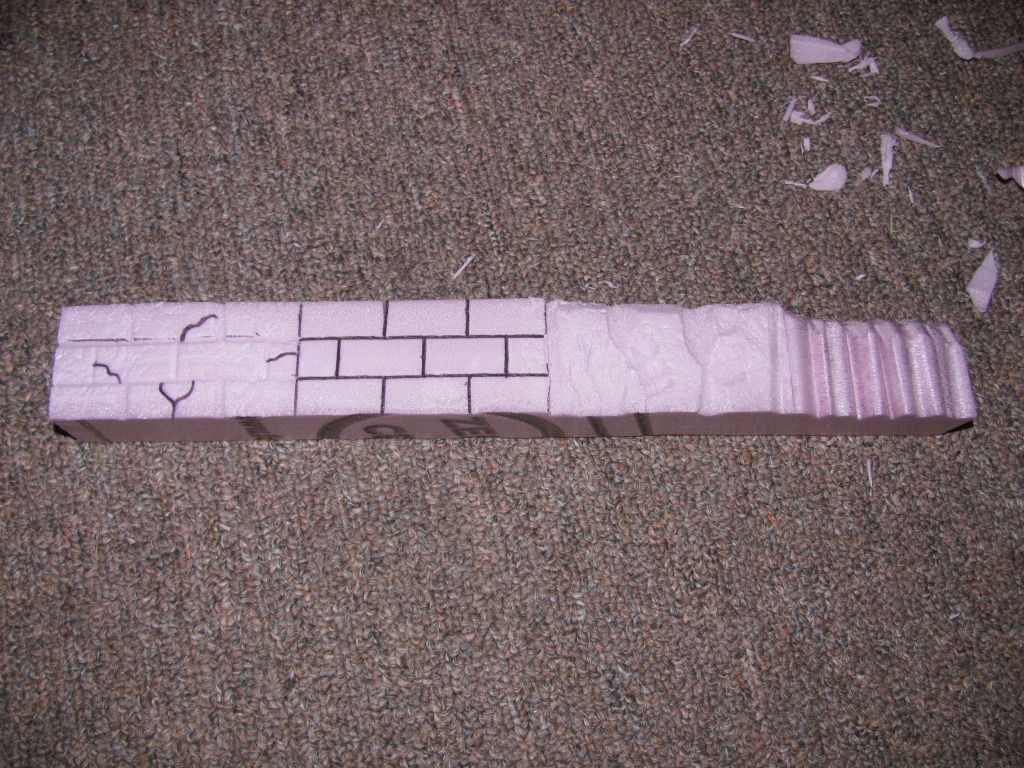
Now, Section 2 is getting a special treatment. I have a Silhouette SD paper cutter which is essentially a printer with a knife blade. It cuts out paper for scrap booking and the like. I designed some wall patterns and fed them through the cutter, you could do this by hand also, hence the inclusion. As a point of interest, it took me 4 hours to do walls for a single tile using this technique, so migraine alert. It takes that long to do an entire caves walls.
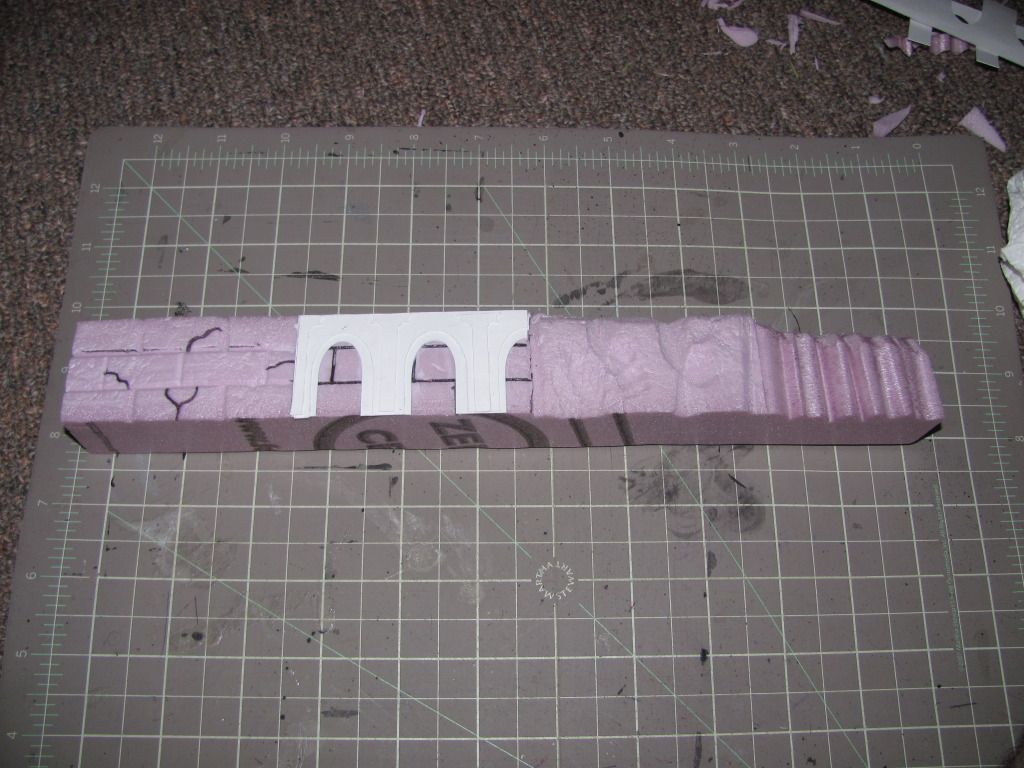
Comparison with figure.
Till next time.
Detailing Floors
To do the floor detail is really easy, get a ballpoint pen (Some people use a dead one, I like to see my lines and find it is easier when the ball still rolls) then have at it. This is really easy actually. If you want to roughen up your ground, you can use an aluminum foil ball as shown below.

Wall Design
I am doing the walls in a variety of techniques at once here, so bear with me. Sections 1 and 2 are both hewn rock walls, 3 and 4 are different types of cave walls.

Section 1 has blocks cut out like the floors are done, this creates an old block feeling which would be good for most dungeon style layouts. It is mildly time consuming but looks nice. Section 2 has blocks drawn in with a pen, this creates a new block wall style that would work well for a castle or an egyptian looking location. Section 3 is done by taking the knife at an angle and ripping chunks of foam out. It is fast easy, but does require a little bit of time to learn to do well, a few practice pieces will work well, try whatever tools you have around. Section 4 is done with a wire cutter, this would make nice ice or water worn cave.

I'm going to spend more time on 3 as it is what most of you have seen from me and seems to work best for Super Dungeon Explore (especially with Caverns of Roxor coming out soon) After cutting some chunks out with a knife, take your fingers and dig in with your nails pulling upwards, this makes a circular pocket pullout that works well, linking them together has a pleasing appearance.

Now, holding the knife perpendicular to the surface drag it across lightly, do this a bit till it starts to break apart. Then rub with your finger tip.

Lastly, section 1 and 3 have had a ball of aluminum foil rolled across them, this makes a nice rough surface that works well for drybrushing, to be honest, I don't like this appearance and rarely use it. However, it does work well and can create a nice appearance.

Once again, break out the pen and draw cracks onto section 1, this gives the stone character, try and be random. Evenly spaced is not random, have some clumps, have some clean sections, etc. When painting, weather accordingly.

Now, Section 2 is getting a special treatment. I have a Silhouette SD paper cutter which is essentially a printer with a knife blade. It cuts out paper for scrap booking and the like. I designed some wall patterns and fed them through the cutter, you could do this by hand also, hence the inclusion. As a point of interest, it took me 4 hours to do walls for a single tile using this technique, so migraine alert. It takes that long to do an entire caves walls.

Comparison with figure.

Till next time.
Saturday, July 14, 2012
Super Dungeon Explore Quests!
I've been playing with altering some of the mechanics in SDE to allow for campaign play. One thing I wanted was to limit the amoutn of stuff you'd need, currently I've got it limited to a few PDF's with one being cards that would need printed to Cardstock, thankfully that is only four pages, so pretty minimal.
Anyways the intent is to remove spawning, remove the Adventure tracker Board and give players set objectives to accomplish on a preset quest, using preset boards and preset monsters. This allows thematic game-play with a specific plot. One issue with this I found was monsters are simply too squishy, which is great with an unlimited supply, but when there are a set number, it becomes a problem, so I came up with an alternative, Spawn Points provide monsters with bonuses on their tile. So a Kobold Warren provides a 1 blue die bonus to armor for example, this provides a bit more staying power for them.
Now, you'll note, no Loot-O-Meter, how do heroes get tougher, well, they buy Loot Cards, with gold, and they get gold by completing adventures and finding treasure cards. Relic cards may also be purchased but are really expensive, generally you will find Relic cards, and usually they will be predetermined as then they can be balanced for.
Anyways, so I've rambled a bit and left a lot of questions, but once I have play-tested a few times I'll release a full preview of the rules. I would like a few volunteers to help create some page borders fr the rules book and the quest book. As well as one or two guys to help write the campaign, I'd ultimately like to see 2 campaigns using the basic book, or a split campaign with multiple paths that converge and split allowing some replay. I have outlines for the first 2 levels with 3 stages each, but no more, I'd like at least 4 levels using the core game.
Anyways, a little preview for those who are curious.
A Sample Quest (some of the mistakes have already been fixed here)
Sample Quest
A selection of the Treasure Deck
Treasure Deck Samples
Wednesday, July 11, 2012
Insulation Board Dungeon Tutorial Pt 1
Ok guys, I had promised a tutorial on how to make Insulation Board Dungeons, and here is the first half. This goes all the way up to wall construction, but does not include wall detailing, floor detailing or painting, to be fair, most of that you'll be able to figure out yourself.
To replicate what I have done, you'll need the following supplies (I only priced things that are disposable)
1/2" Insulation Board ($12)
1.5" Insulation Board ($22)
Break Blade Utility Knife ($3)
Steel Ruler (A longer measuring tape will help, but isn't required)
Pen
Also, here are a few important notes, this information is relevant all the time, and if I skip a measurement, it is here.
Squares should be 30mm, 25mm (1") will work, but things will be too tight, you can go larger, but then your layout is larger with out more playable space, your call.
My Tiles are 12 squares across, this includes the halls though, original tiles were 12 squares across not counting the halls, it is your call how to proceed. I count the edge tiles when moving and such though, so I still have 12 playable. 36cm for my tiles or 42cm to replicate the original boards.
Walls cover all but the center 2 squares at the edges. You can change this to add more access points per tile, but keep it consistent. I could have went with a layout with 2 entrances per tile say at the 3rd and 4th square and the 9th and 10th, but you'd always want that.
Everywhere must have a 2 width hall or Angry Bear can't fit. Also, goo luck squeezing your fingers in there. Diagonals have a minor exception. You can create a tiles that has a diagonal of 1 tile corner to corner, as per the movement rules angry bear will still fit. I believe one of the official; tiles is layed out like this.
Some quick tips
-Make your tile cuts and wall cuts as straight and vertical as possible, the tiles will fit better if you do.
-Use a pen, not a marker, marker seeps through the paint as it doesn't bond properly to the foam board (IMPORTANT)
- Don't use a hot wire cutter. Unless you have a table and are using it to make the blocks that will be walls.
- Don't sweat minor mistakes, just leave them alone, no one will ever notice.
- Long Cuts aren't straight, use a ruler to draw your line, then remove said line with your cuts. 45 degree angle on either side is fine, but don't make the knife be perfect, better it strays a bit to provide character to the lines.
- Many shallow cuts rather than hacking through the foam in one pass.
- When making walls and such, use your fingers, run the blade across the surface roughly, dig deep V's into the foam, then rub the stuff with your fingers, it makes a nice texture.
- Hot Glue is the best glue to use.
- Don't worry about painting it well, just well enough that no one notices how badly it is really use, make sure to use a fat brush.
Alright, onto the tutorial, I skipped some basic stuff, so please forgive me.
1) PLAN - Grab some graph paper (or print some offline) and layout your dungeon rooms, turn the page, make sure everything will work, decide early one the theme of the dungeon, a cave, a castle, a forest, you name it and it could be done. Also something like a lava cavern sounds cool, but will be a lot more challenging than a simple cavern, once you get good, add cool rooms like this later. I pick a theme first, then start making my tiles.
2) BASICS - When you get your foam board form the store, it comes in a 4x8 sheet, good luck getting it into your car. Ask someone to cut it for you, I usually have them cut it about two tiles thick with a little excess, sure I waste some, but then if their cuts aren't perfect you didn't waste a lot. Take off the plastic, there is a thin layer of clear plastic over the board, take it off. Now, measure out your tiles and cut them with the knife, it's easy and the thin foam cuts pretty quick, if you are mostly through you can snap the foam by flexing it cut open, then cut closed. Once you have your stack of tiles, which is very easy to cut the tiles, proceed.
3) GRIDDING - It is important to grid your tiles as accurately as you can, if you have a square, use it to check your lines, if not, well wing it :D I shouldn't need to tell you much about gridding.
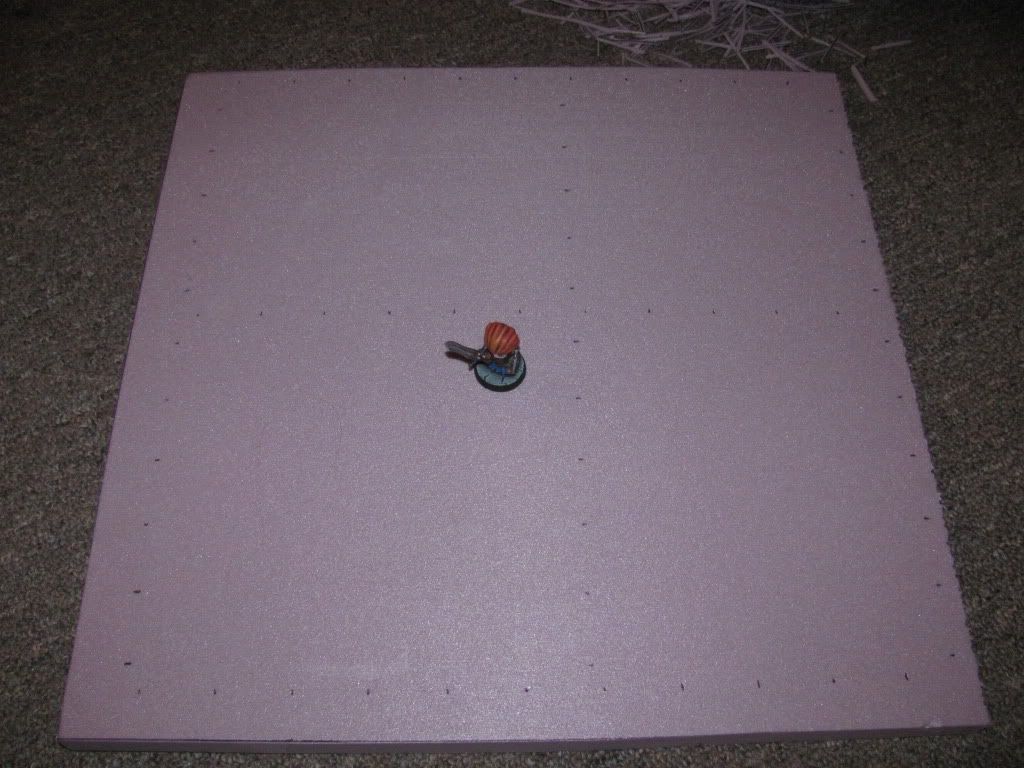
4) LAYOUT - Once your grid is in place, layout your dungeon, use a pen and draw in all the walls and such. Don't draw too heavy if you make a mistake it may show on the final design.
5) EDGING - Your first cuts should be to vertically trace all your walls. this helps define them when they are in place and ensures there are no cuts under the walls.
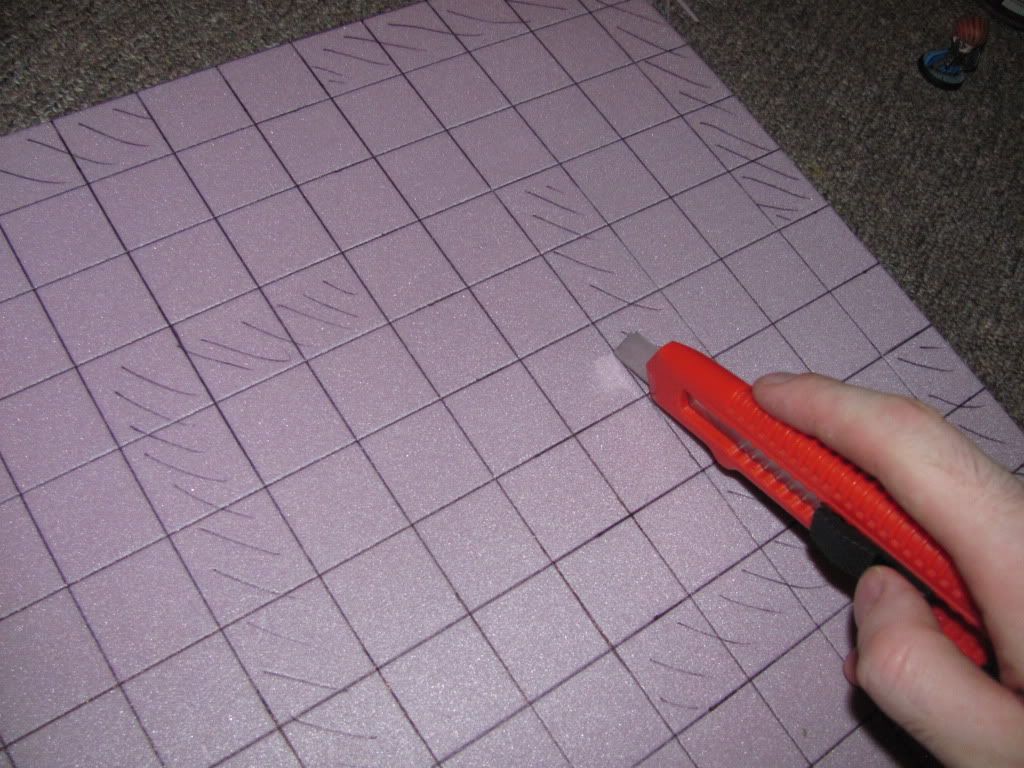
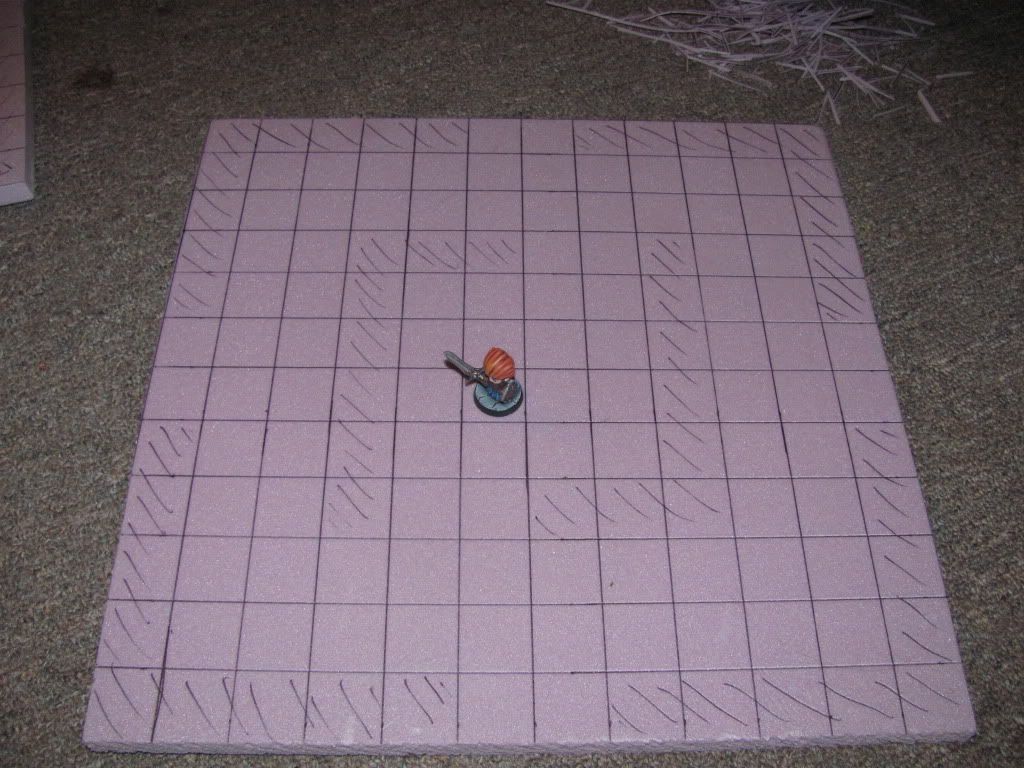
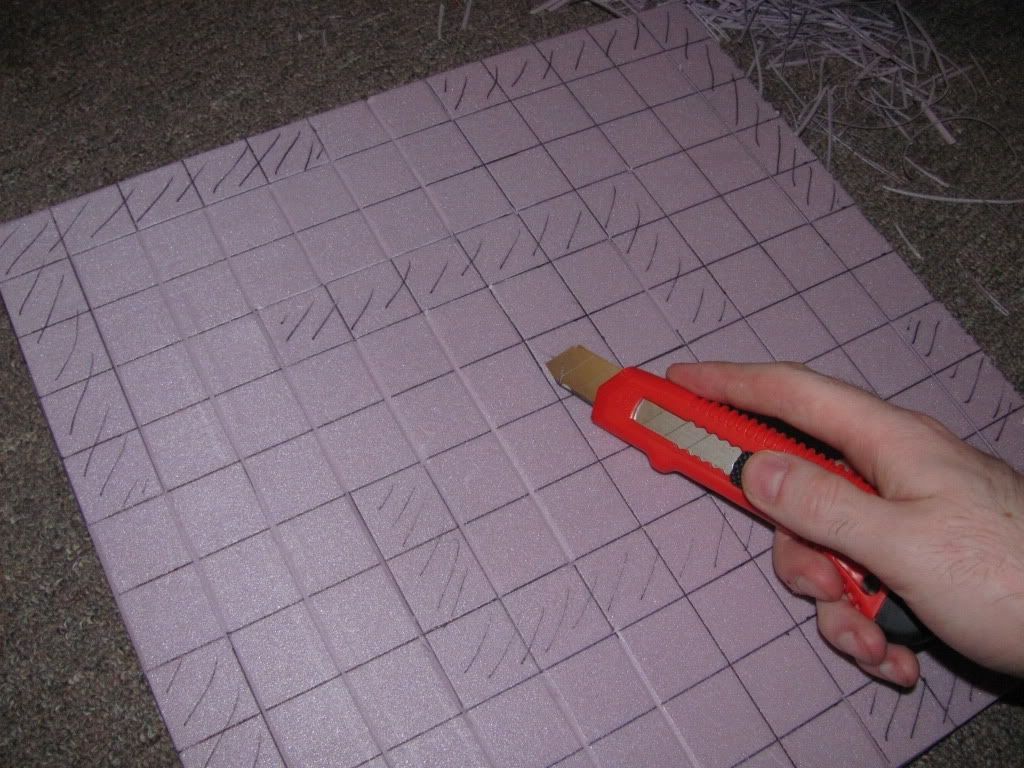
6) TILES - Now holding your knife at a 45 degree angle, start cutting channels where the grid lines are, do all your vertical cuts one way, rotate the tile and do the other ways. If some of the pieces get stuck a small Xacto knife can be very helpful.
Woohoo, your tiles are done! They are pretty simple to make actually, it's just getting the hang of it. Also, it does take a while.
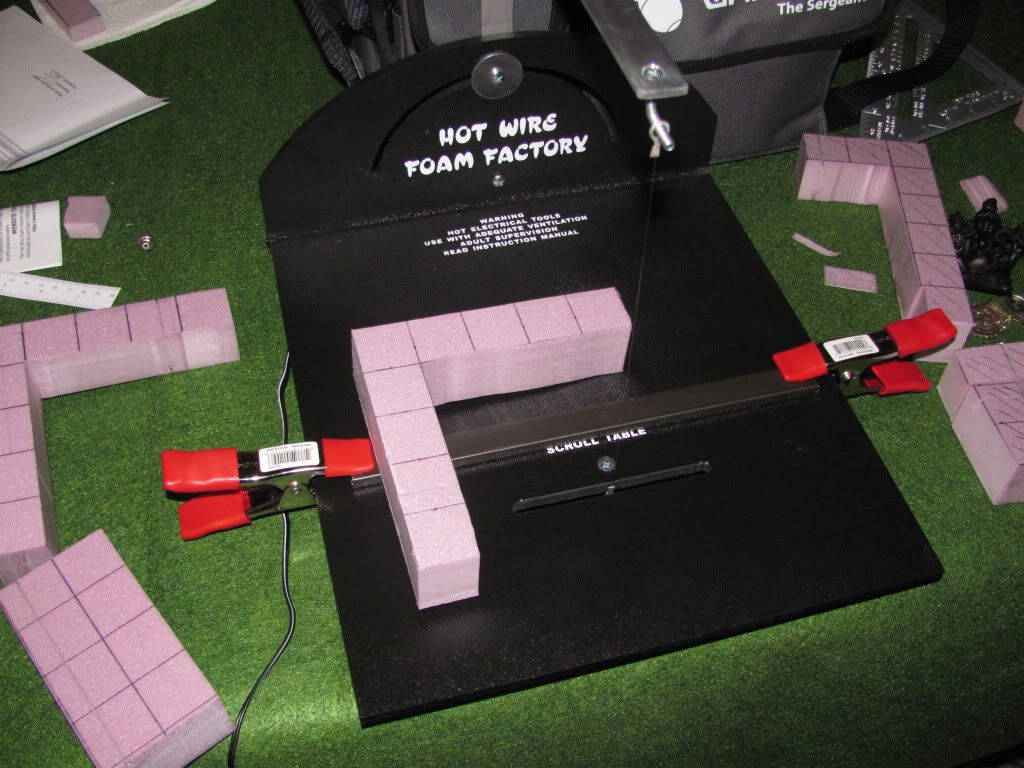
Walls are a bit tougher as the foam is thicker. You can either use a cutter to do the walls if making something like a cave as you are likely to have rough lines when done, I'd recommend this on your first go. If you have a hot wire table, castle style walls will be easier as you can make nice clean vertical cuts.
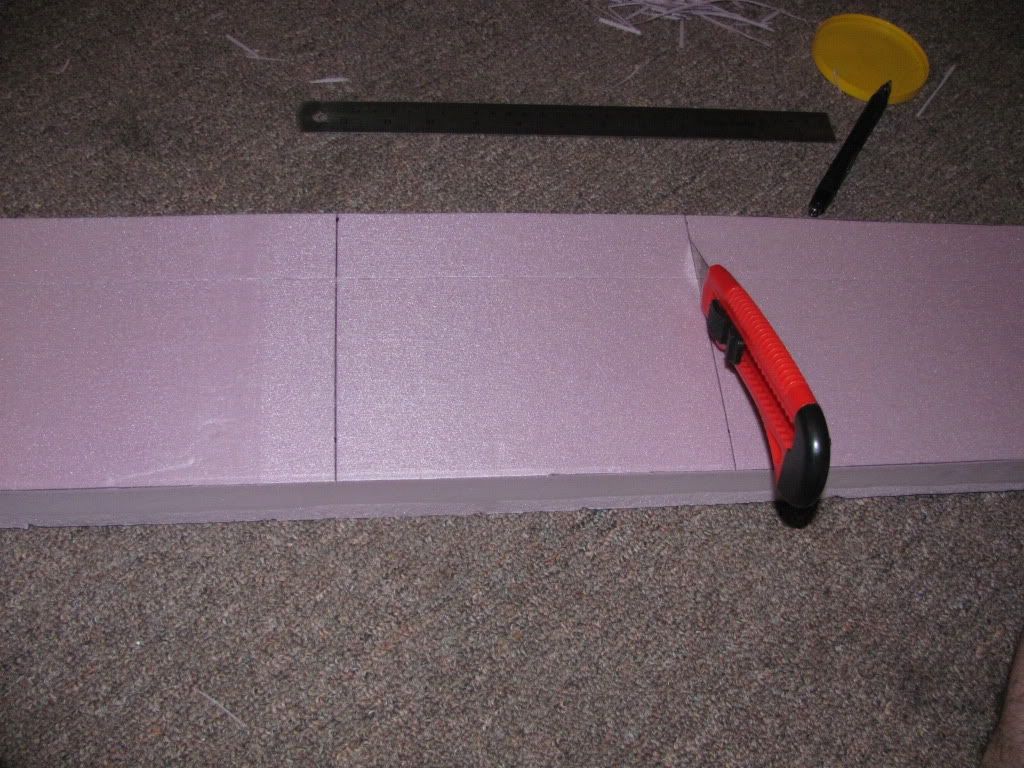
1) BASICS - To get your walls, I take a strip of foam 15cm long and cut it into 15cm by 18cm blocks, this gives me 2 corners and the centers are then used for other bits in the rooms when possible. Corners should be a 15cm by 15cm L shape.
2) SHAPING - Once your blocks are cut, draw a grid on them and figure out your wall shapes, once they are drawn on, cut them out with a knife (remember many passes 3 is usually about right) or a table cutter, if using a table you'll likely need to have something to follow to get your lines straight, I clamped a piece of window screen frame to my table, but whatever you have will work (Forgot pics, doh)
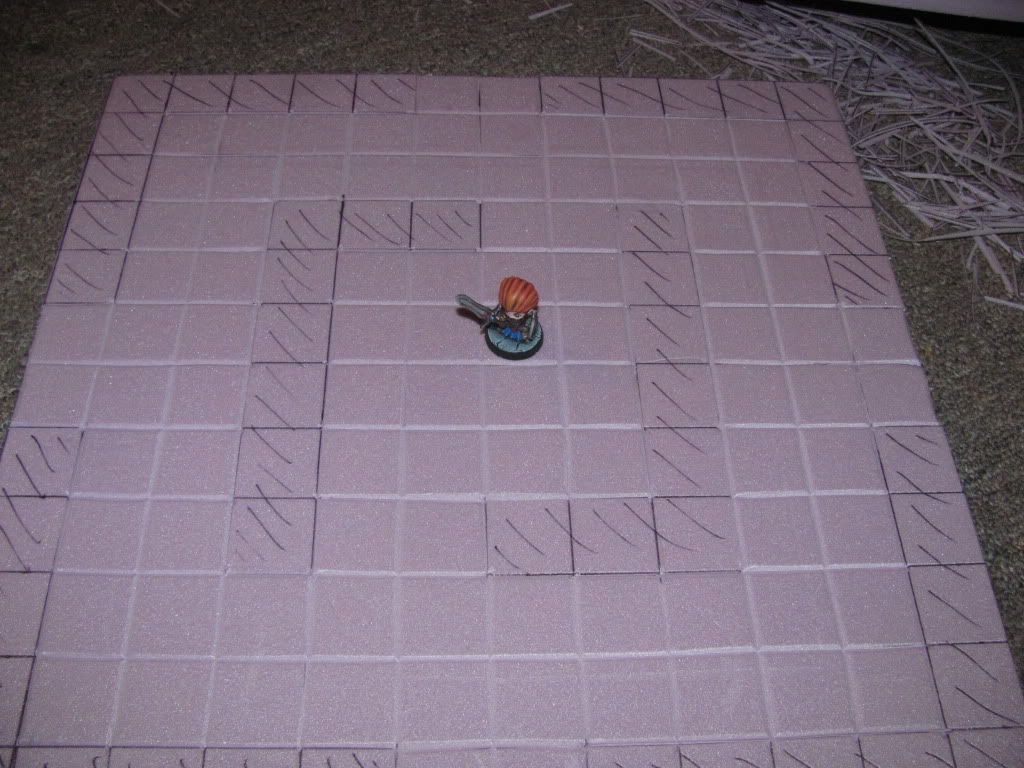
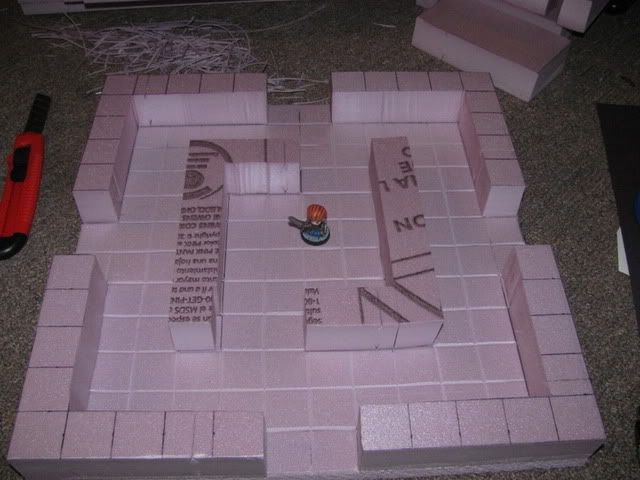
3) TEST FIT - Double check everything by putting it onto the tile, make sure you didn't screw up too badly :)
More dungeony goodness in Part II. And I need to go and cut out the rest of my tiles.
Also, if someone wants a dungeon layout and does not want to construct one, I am willing to custom make these, due to the time involved I am leaning towards $30 per tile, so a set of 5 tiles would be $150.
To replicate what I have done, you'll need the following supplies (I only priced things that are disposable)
1/2" Insulation Board ($12)
1.5" Insulation Board ($22)
Break Blade Utility Knife ($3)
Steel Ruler (A longer measuring tape will help, but isn't required)
Pen
Also, here are a few important notes, this information is relevant all the time, and if I skip a measurement, it is here.
Squares should be 30mm, 25mm (1") will work, but things will be too tight, you can go larger, but then your layout is larger with out more playable space, your call.
My Tiles are 12 squares across, this includes the halls though, original tiles were 12 squares across not counting the halls, it is your call how to proceed. I count the edge tiles when moving and such though, so I still have 12 playable. 36cm for my tiles or 42cm to replicate the original boards.
Walls cover all but the center 2 squares at the edges. You can change this to add more access points per tile, but keep it consistent. I could have went with a layout with 2 entrances per tile say at the 3rd and 4th square and the 9th and 10th, but you'd always want that.
Everywhere must have a 2 width hall or Angry Bear can't fit. Also, goo luck squeezing your fingers in there. Diagonals have a minor exception. You can create a tiles that has a diagonal of 1 tile corner to corner, as per the movement rules angry bear will still fit. I believe one of the official; tiles is layed out like this.
Some quick tips
-Make your tile cuts and wall cuts as straight and vertical as possible, the tiles will fit better if you do.
-Use a pen, not a marker, marker seeps through the paint as it doesn't bond properly to the foam board (IMPORTANT)
- Don't use a hot wire cutter. Unless you have a table and are using it to make the blocks that will be walls.
- Don't sweat minor mistakes, just leave them alone, no one will ever notice.
- Long Cuts aren't straight, use a ruler to draw your line, then remove said line with your cuts. 45 degree angle on either side is fine, but don't make the knife be perfect, better it strays a bit to provide character to the lines.
- Many shallow cuts rather than hacking through the foam in one pass.
- When making walls and such, use your fingers, run the blade across the surface roughly, dig deep V's into the foam, then rub the stuff with your fingers, it makes a nice texture.
- Hot Glue is the best glue to use.
- Don't worry about painting it well, just well enough that no one notices how badly it is really use, make sure to use a fat brush.
Alright, onto the tutorial, I skipped some basic stuff, so please forgive me.
1) PLAN - Grab some graph paper (or print some offline) and layout your dungeon rooms, turn the page, make sure everything will work, decide early one the theme of the dungeon, a cave, a castle, a forest, you name it and it could be done. Also something like a lava cavern sounds cool, but will be a lot more challenging than a simple cavern, once you get good, add cool rooms like this later. I pick a theme first, then start making my tiles.
2) BASICS - When you get your foam board form the store, it comes in a 4x8 sheet, good luck getting it into your car. Ask someone to cut it for you, I usually have them cut it about two tiles thick with a little excess, sure I waste some, but then if their cuts aren't perfect you didn't waste a lot. Take off the plastic, there is a thin layer of clear plastic over the board, take it off. Now, measure out your tiles and cut them with the knife, it's easy and the thin foam cuts pretty quick, if you are mostly through you can snap the foam by flexing it cut open, then cut closed. Once you have your stack of tiles, which is very easy to cut the tiles, proceed.
3) GRIDDING - It is important to grid your tiles as accurately as you can, if you have a square, use it to check your lines, if not, well wing it :D I shouldn't need to tell you much about gridding.


4) LAYOUT - Once your grid is in place, layout your dungeon, use a pen and draw in all the walls and such. Don't draw too heavy if you make a mistake it may show on the final design.

5) EDGING - Your first cuts should be to vertically trace all your walls. this helps define them when they are in place and ensures there are no cuts under the walls.

6) TILES - Now holding your knife at a 45 degree angle, start cutting channels where the grid lines are, do all your vertical cuts one way, rotate the tile and do the other ways. If some of the pieces get stuck a small Xacto knife can be very helpful.


Woohoo, your tiles are done! They are pretty simple to make actually, it's just getting the hang of it. Also, it does take a while.
Walls are a bit tougher as the foam is thicker. You can either use a cutter to do the walls if making something like a cave as you are likely to have rough lines when done, I'd recommend this on your first go. If you have a hot wire table, castle style walls will be easier as you can make nice clean vertical cuts.
1) BASICS - To get your walls, I take a strip of foam 15cm long and cut it into 15cm by 18cm blocks, this gives me 2 corners and the centers are then used for other bits in the rooms when possible. Corners should be a 15cm by 15cm L shape.

2) SHAPING - Once your blocks are cut, draw a grid on them and figure out your wall shapes, once they are drawn on, cut them out with a knife (remember many passes 3 is usually about right) or a table cutter, if using a table you'll likely need to have something to follow to get your lines straight, I clamped a piece of window screen frame to my table, but whatever you have will work (Forgot pics, doh)

3) TEST FIT - Double check everything by putting it onto the tile, make sure you didn't screw up too badly :)

More dungeony goodness in Part II. And I need to go and cut out the rest of my tiles.
Also, if someone wants a dungeon layout and does not want to construct one, I am willing to custom make these, due to the time involved I am leaning towards $30 per tile, so a set of 5 tiles would be $150.
Subscribe to:
Posts (Atom)